
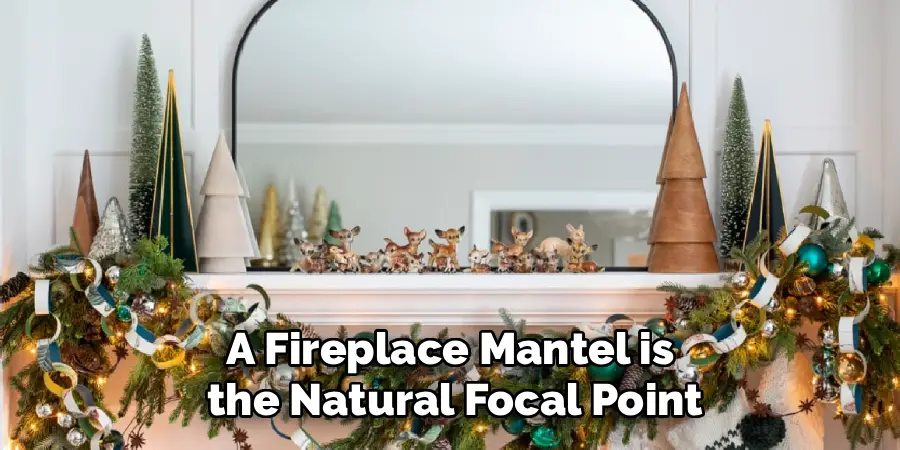
A fireplace mantel is the natural focal point of any room, and dressing it with greenery is one of the easiest ways to add warmth and charm. If you have ever admired a beautifully styled fireplace and wondered how to decorate mantel with garland yourself, you are in the right place. The good news is that you do not need professional design skills or expensive materials to get a stunning result.
This guide breaks the whole process into clear, manageable steps that work for any skill level. Whether you are decorating for the holidays, a special occasion, or simply want a fresh seasonal look, garland offers endless flexibility. You can go lush and dramatic or keep things simple and understated, all depending on your style and the room’s mood.
By the end, you will feel confident choosing the right greenery, securing it safely, and adding those finishing touches that make a mantel feel polished. Let’s turn that plain shelf into something you will love showing off.
Why Decorating Your Mantel With Garland Matters
Garland does more than fill empty space above your fireplace. It instantly softens hard lines, adds texture, and brings a sense of life to a room that photos and picture frames alone cannot match. A well-styled mantel becomes an inviting centerpiece that draws the eye and sets the tone for your entire space.
There is also a practical side to consider. Garland is affordable, reusable, and quick to swap out as seasons change. You can refresh your look throughout the year without committing to permanent décor. Best of all, it works with nearly any interior style, from rustic farmhouse to sleek modern. That versatility means your effort pays off long after the first arrangement goes up.
Step-by-Step Guide to How to Decorate Mantel With Garland
Step 1: Choose the Right Greenery
Start by picking garland that suits your space and the feeling you want to create. Faux garland lasts for years and holds its shape, while fresh greenery like pine or eucalyptus brings a natural scent and softer texture. Consider the thickness too, since a fuller garland makes a bolder statement while a slimmer one feels more delicate.
Think about your color palette as well. Deep evergreen pairs beautifully with warm metallics, while lighter sage tones lend a calmer, modern vibe. Measure your mantel width first so you buy enough length. A good rule is to allow extra for graceful draping and overhang on each side.
Step 2: Gather Your Tools and Materials
Before you begin, collect everything in one place so the process stays smooth. Learning how to decorate mantel with garland becomes far easier when you are not searching for supplies mid-project. You will want your garland, of course, along with floral wire, adhesive hooks, and a sturdy pair of scissors or wire cutters.
Grab any accents you plan to add, such as ribbon, string lights, ornaments, pinecones, or candles. Having these items ready lets you visualize the finished look before committing. It also helps you spot gaps early. A small step stool is worth keeping nearby too, since safe, comfortable reach makes the whole job quicker and more enjoyable.
Step 3: Secure the Garland Safely
Now it is time to anchor your greenery so it stays put. Use adhesive hooks or small nails placed at even intervals along the underside or top edge of your mantel. Attach floral wire to the garland and loop it around each anchor point, keeping tension consistent so the greenery does not sag unexpectedly in the middle.

Work from one end to the other, adjusting as you go. If your mantel is deep, you can rest part of the garland on top and let the rest drape forward. Always test the hold gently before adding heavier decorations. A secure base prevents frustrating slips and keeps everyone in the room safe.
Step 4: Create Natural Draping and Movement
A flat, stiff garland can look lifeless, so aim for gentle curves and organic flow. Let the greenery dip slightly between anchor points to form soft swags, then allow the ends to cascade down the sides of the fireplace. This movement mimics how plants grow and gives your arrangement a relaxed, professional feel.
Fluff and separate the branches with your hands to add fullness and dimension. Bend individual stems in different directions so nothing looks pressed flat or artificial. Step back frequently to check the shape from across the room. Small adjustments here make a big difference, transforming a plain strand into a rich, layered display that feels intentional.
Step 5: Add Lighting for Warmth
Lighting brings your mantel to life, especially in the evening. Weave a string of warm white fairy lights through the garland, tucking the wire behind branches so only the glow shows. Battery-operated lights work wonderfully here since they remove the need for a nearby outlet and hide cords with ease.
Distribute the bulbs evenly so no section looks brighter than another. If you prefer a softer effect, choose lights with a dimmer or a twinkle setting. Candles, whether real or flameless, add another cozy layer on the mantel surface. Just keep any open flame well clear of the greenery to stay safe.
Step 6: Layer in Decorative Accents
With your base set, personalize the look with accents that reflect your style. Tuck in ornaments, berries, pinecones, or dried florals, nestling them among the branches rather than sitting them on top. Odd-numbered groupings tend to look more balanced and natural than perfectly symmetrical placements.
Vary the height and size of your objects to keep the eye moving across the display. Taller candlesticks or framed art behind the garland add depth, while smaller trinkets fill in negative space. Ribbon woven through the greenery adds softness and a pop of color. Resist overcrowding, since a little breathing room lets each element shine.
Step 7: Review and Refine Your Display
The final step is stepping back to assess the whole picture. Walk to the opposite side of the room and view your mantel the way guests will see it. Look for uneven gaps, drooping sections, or accents that feel out of place, then make small tweaks until everything feels cohesive and balanced.

Check that lights are hidden, wires are tucked, and the draping flows smoothly on both sides. Take a photo on your phone, since a camera often reveals imbalances your eye misses in person. This quick review is where good décor becomes great, so give yourself permission to adjust until it truly feels right.
Frequently Asked Questions
How Much Garland Do I Need for My Mantel?
Measure the length of your mantel and add roughly one and a half to two times that amount to allow for draping and side overhang. For a standard six-foot mantel, aim for around nine to twelve feet of garland. Extra length gives you flexibility to create fuller swags and cascading ends, which look far more elegant than a tight, stretched strand.
Should I Use Real or Faux Garland?
Both options work well, so the choice depends on your priorities. Real garland offers authentic texture and a lovely natural scent, though it sheds and lasts only a few weeks. Faux garland costs more upfront but lasts for years and stores easily between seasons. Many people combine the two, using faux as a base and adding fresh sprigs for scent and realism.
How Do I Keep My Garland From Sagging?
Consistent tension is the key to preventing droop. Anchor the garland at several evenly spaced points using floral wire and sturdy hooks rather than relying on one or two supports. For heavier arrangements, add an extra anchor in the middle. Test the hold before decorating, and redistribute weight if any section pulls downward more than the rest.

Can I Decorate a Mantel Without a Fireplace?
Absolutely, and the same techniques apply beautifully. Any shelf, console table, or wall-mounted ledge can serve as your canvas. Secure the garland with adhesive hooks that will not damage surfaces, then layer in lights and accents just as you would above a fireplace. This flexibility makes seasonal styling possible in apartments and rooms without a traditional hearth.
How Do I Store Garland After the Season Ends?
Gently remove any accents and lights first, then loosely coil the garland to avoid crushing the branches. Store it in a large bin or a sturdy box rather than a tight bag, which can flatten the shape. Keep it somewhere cool and dry. Before reusing, simply fluff the branches back into place and it will look fresh again.
Conclusion
Styling your fireplace does not have to feel overwhelming once you break it into simple, repeatable steps. From choosing the right greenery to securing it safely, adding warm lighting, and layering in personal accents, each stage builds toward a display that feels both polished and welcoming. The beauty of learning how to decorate mantel with garland is that you can adapt every element to match your taste and refresh it whenever inspiration strikes.
Trust your eye, take your time with the finishing touches, and do not be afraid to experiment. Small adjustments often make the biggest impact, so keep tweaking until your mantel feels just right. Now gather your materials, follow these steps, and enjoy transforming your space into a cozy, eye-catching centerpiece you will be proud to show off.

Rick is a handyman who grew up helping his dad with his business. He learned a lot from him about how to fix things, and also about how to work hard and take care of business. These days, Rick is still into fixing things- only now, he’s doing it for a living.
Rick is always looking for new ways to help people grow and develop. That’s why he started contributing to this blog: to share all his experience and knowledge so that he can help people who are interested in DIY repair.