

If you’ve ever found yourself squinting at the first hint of sunrise or counting sheep under the glow of a nearby streetlamp, you already know how much ambient light can sabotage a night’s rest. It doesn’t take much—sometimes just a thin line where the blind doesn’t quite meet the frame—to throw your sleep off track. Odd, isn’t it? Something so small can have you wide awake at 5 a.m., puzzling over your window treatments and plotting ways to keep the glare at bay.

Let’s be honest: Most blinds are imperfect guards against the outside world. They’re designed with a bit of wiggle room so you can lift and lower them without scraping the paint off your windows. Unfortunately, that little gap is all sunlight needs to sneak in. Tack on the tiny holes used for lift cords, and you’ve got a room that’s never truly dark, no matter how much you wish otherwise. In this guide on how to block light around blinds, we explore various methods for reducing the amount of light that seeps through these common window treatments.
Why Does Light Sneak Around Blinds?
You’d think a snug fit would solve everything, but here’s where practicality gets in the way of perfection. Window frames and blinds are never quite flush—by design. Otherwise, the blind would jam every time you moved it.
These deliberate gaps—a few millimeters here, a slight recess there—add up. Light traces the edges, spills over the top, and sometimes manages to peek through the bottom. Cord holes in slatted blinds make matters worse, giving tenacious little sunbeams one more entry point.
What You’ll Need: Supplies for the Task
Before diving into this project, a bit of preparation pays off. No surprises there. You’ll want:
- A measuring tape (the retractable steel kind is best)
- Plastic light-blocking strips, ideally L-shaped
- Weatherstripping tape or foam sealant
- Rubbing alcohol and a lint-free cloth
- Scissors tough enough for plastic, or a small hacksaw
- A valance or cornice, if you like that finishing touch
- Heavy blackout curtains with a tension rod (these are optional, but helpful)
7 Simple Steps on How to Block Light Around Blinds
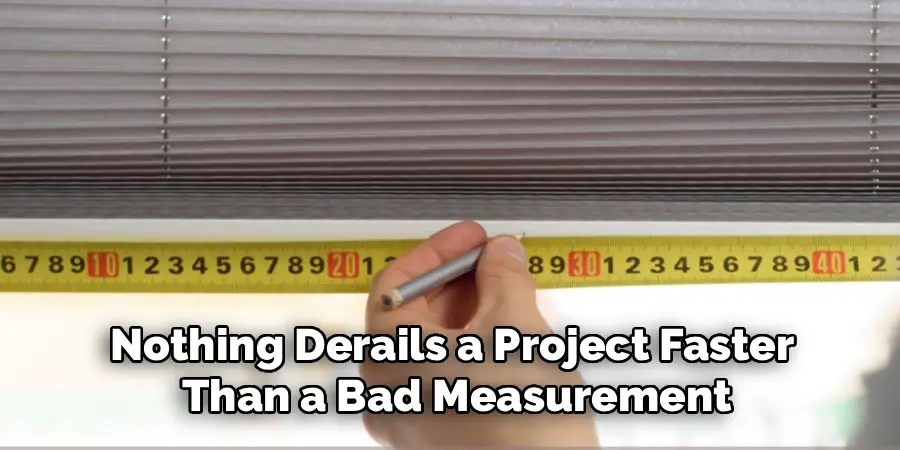
Step 1: Get the Measurements Right
Everything starts here. Nothing derails a project faster than a bad measurement. Jot down the full height of each window, left to right, top to bottom. Take care with the bottom sill if you’re blocking light there, too. Sometimes you’ll catch yourself re-measuring; that’s for the best. Too long, too short—either one leaves you squinting at daylight after all your effort. There’s a certain satisfaction in getting it exactly right, knowing the strips will fit as if the window was made for them.
Step 2: Sizing Up Your Options
Shopping for light-blocking strips feels strangely specific—most people have never wandered this particular aisle before. Aim for L-shaped plastic strips; they nestle up to both the window frame and the blind edge neatly. The right color fades into the trim, saving you from a patchwork look. Most decent strips come pre-taped, which you’ll be thankful for. Single, uncut lengths are best—piecing together short strips tends to look sloppy and lets in more light than you hope.
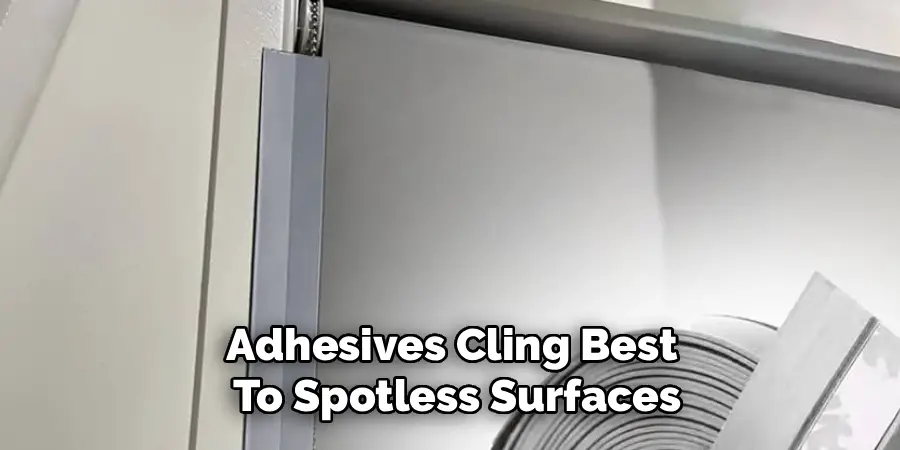
Step 3: Prep Like You Mean It
If you gloss over the cleaning phase, you’ll pay for it later. Adhesives cling best to spotless surfaces, and window frames attract a surprising mix of dust, moisture, and greasy fingerprints. Rubbing alcohol evaporates fast and takes residue with it, so saturate a cloth and wipe everything down. Give it a minute to dry before touching anything sticky. It’s tempting to rush, but in my experience, shortcuts here only lead to drooping strips after a few days, especially when the afternoon sun starts baking your windows.
Step 4: Stick With Care
Ready? Ease the backing off the first strip, but don’t yank it all at once. Set the top corner; let gravity help you line it up. You’ll get a neater seal if you press slowly, working downward as you go. A wobbly installation means revisiting with a hairdryer and a lot of regret. The goal: a crisp line that hugs the window tightly from top to sill. Repeat on the other side, double-checking the alignment. Lower the blind to test coverage—if those strips do the job well, you’ll barely detect any peripheral light.
Step 5: Taming the Top Gap
Light seems especially stubborn over the top edge—a common frustration. If you don’t want the project to look piecemeal, consider adding a valance or cornice. These aren’t just decorative. They hide any halo of light and lend a bit of polish, sometimes feeling almost architectural in effect. For a quick-fix approach, foam weatherstripping across the top casing can stop the remaining glow, especially if fitted snugly behind the blind’s headrail. Both options are reliable; some simply look nicer than others.

Step 6: Bring in the Heavy Hitters
There’s a limit to what plastic strips can achieve. For the truly light-sensitive, blackout curtains are a game-changer—a phrase that’s become a cliché but fits here. Mount the rod just above and wider than the window, so the fabric overlaps the wall by several inches. Don’t be fooled by “room darkening” labels; those let through more than enough light to break your sleep cycle. Go for “100% blackout.” You can throw the curtains open in the morning, but by night, draw them tight. The combined effect: nearly total darkness, plus a bit of sound and heat insulation as a bonus.
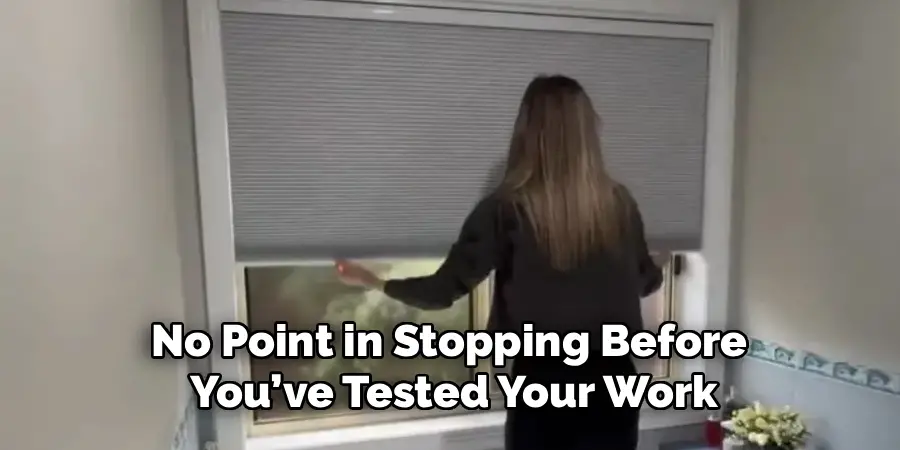
Step 7: The Final Inspection
No point in stopping before you’ve tested your work. Wait for the brightest part of the day, close your blinds, and sit in the dark for a few minutes. It sometimes takes a while for your vision to adjust; small leaks stand out after a moment or two. The bottom rail is a usual suspect—if light creeps underneath, a strip of foam can address it in moments. If your blinds have those telltale cord holes, it might be time to consider different blinds down the road. For now, the curtains should mask pinpricks of light.
Following these steps on how to block light around blinds can greatly improve your sleep quality and lead to a more restful night. But what about other sources of light in your bedroom?
One common culprit is electronics, such as alarm clocks or charging stations. Even the tiny LED lights on these devices can disrupt your sleep. To combat this, try covering them with a small piece of electrical tape or flipping them over so they face away from you.
Another source of light that can be easily overlooked is streetlights outside your window. If these are an issue for you, consider investing in blackout curtains or shades specifically designed to block out light.
Additionally, be mindful of any gaps around doors or windows that may be letting in unwanted light. You can use weatherstrips
Easy Mistakes to Watch For
A few pitfalls crop up again and again. Skipping the cleaning step is the classic blunder—next thing you know, the adhesive is losing its grip. Cutting strips a hair too short (either in haste or misreading the tape) leaves you chasing errant sunbeams across the floor.
And don’t let yourself be tempted by masking tape or DIY experiments; they fail, peel, and leave an ugly mess. If you invest a little time and choose materials designed for light blocking, the result will look tidy and intentional, not slapdash.
Keeping It All Working Smoothly
Temperature changes, humidity, and life—these all mess with adhesive. Every so often, glance at your strips. If you see curling edges, press them back or use some fresh double-sided tape. Dust seems drawn to window fittings; a quick swipe with a microfiber cloth each week will keep the seam clean, letting the blinds sit flush.
Sometimes blinds go crooked, gapping at the bottom. Tweak the lift cords so everything sits even. Occasional attention guarantees that the deep darkness you worked for doesn’t slip away with the seasons.
Common Questions
Q1: Can I Just Use Duct Tape or Something Similar?
It’s tempting, but not wise. Duct tape never completely blocks light, and the glue deteriorates quickly once the sun hits it. Worse, it’ll leave a gummy residue that’s painful to remove. Save yourself the hassle.
Q2: Are Adhesive Light-blockers a Risk for Renters?
Usually, no. Most of these strips peel away easily and leave little behind. Any leftover stickiness can typically be handled with a dab of rubbing alcohol. So, if you’re in a rental, you can experiment without fear of losing your security deposit.
Q3: Why Do My Wood Blinds Still Let Pinpricks of Light in?
Wood (or faux wood) blinds aren’t built for blackout. Their design includes slit gaps and cord holes—which means sunlight always has a way in. Unless you replace them, pairing with blackout curtains is your best shot at a dark room.
Conclusion
Blackout solutions don’t need to be expensive or complicated. By carefully sealing the edges, adding a few strategic upgrades, and being patient with the details, you really can carve out a peaceful, inviting cocoon—one that keeps you blissfully asleep through sunrise and city lights alike.
For anyone facing early shifts, raising babies, or just desperate for an unbroken night’s sleep, these fixes might be what stands between you and a tired, distracted morning. Gather your materials, take your time measuring, and before long, you’ll have built yourself the best kind of refuge: one where the darkness actually works in your favor. Thanks for reading this guide on how to block light around blinds.
Rick is a handyman who grew up helping his dad with his business. He learned a lot from him about how to fix things, and also about how to work hard and take care of business. These days, Rick is still into fixing things- only now, he’s doing it for a living.
Rick is always looking for new ways to help people grow and develop. That’s why he started contributing to this blog: to share all his experience and knowledge so that he can help people who are interested in DIY repair.