

One of the main challenges when it comes to renovating an old home is dealing with the outdated features left behind by previous owners. For example, heating pipes are a common feature that can often be difficult to work around, but there are ways to fill in the gaps and make them less noticeable. Today We’ll discuss how to fill gaps around heating pipes in your next renovation project.
Heating pipes need to be properly insulated to function efficiently. If there are any gaps around the pipes, you could lose heat through those spaces and pay more for your energy bill. There are a few different ways to fill in the gaps, depending on the size of the opening and the materials you have available.

Things You’ll Need
- Caulking Gun
- Silicone Caulk
- Ruler
- Pencil
- Knife
- Sponge
- Bucket or container of water
A Stepwise Guide on How to Fill Gaps Around Heating Pipes
There are a few different ways to fill the gaps around your heating pipes, depending on the size of the gap and the material you have available. The most common methods are using caulk or expanding foam sealant.
If you have a small gap (less than 1/2 inch), you can use caulk to fill it. Apply a thin caulk line to the gap and smooth it out with your finger. Make sure to use a silicone-based caulk, as this type is water-resistant.
If you have a more significant gap (more than 1/2 inch), you can use expanding foam sealant to fill it. This type of sealant expands as it dries, ideal for filling larger gaps. Apply the sealant to the opening and smooth it out with a putty knife. Let it dry completely before using your heating system.
Whichever method you choose, make sure to clean up any excess material, so it does not interfere with the operation of your heating system. Then, you can use a vacuum cleaner or a brush to remove the caulk or sealant.
Step 1: Make your Plan
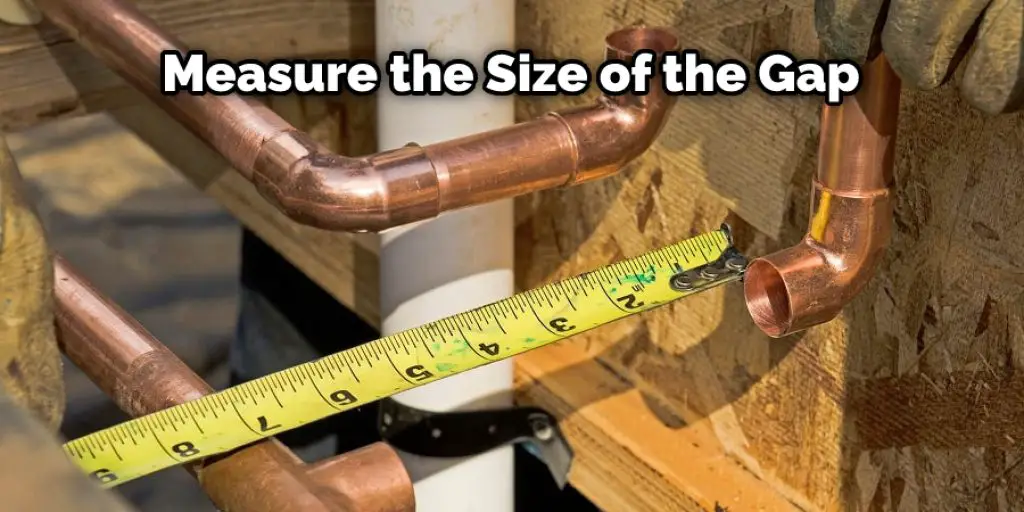
The first step in any project is to make a plan. This is especially true for something as important as your home’s heating system. Before you start filling in the gaps around your pipes, take some time to figure out what you’re doing. Next, measure the area where the hole is, and purchase the right amount of filler material. You don’t want to run out in the middle of the job!

Step 2: Choose the Right Material
Many different materials can be used to fill in gaps around heating pipes. However, not all materials will work well in every situation. Some of the most common filler materials include:
- Caulk/Silicone sealant: A silicone sealant is an excellent option for filling small gaps around pipes. It is easy to use and comes in a variety of colors.
- Foam insulation: Foam insulation is a good option for more significant gaps. It is easy to apply and can be cut to fit the opening.
- Fiberglass insulation: Fiberglass insulation is another option for larger gaps. It is durable and can be easily trimmed to fit the opening.
Step 3: Measure Pipe Gaps and Buy Filler
After locating the gaps, it is time to purchase the filler. First, you will need to measure the size of the gap and find a filler that is the correct size. Many fillers on the market, so finding one should not be difficult. Just make sure that it is designed to be used around pipes.
Once you have the filler, follow the instructions on using it. Most likely, you will have to cut off a piece of filler that is slightly larger than the gap and then press it into the opening. Use a blunt object like a screwdriver or hammer to do this. Make sure that the filler is flush with the surface of the pipe. If there are any gaps, use a caulking gun to fill them in.
Step 4: Prepare the Workspace and Pipe
Wipe down the area where you will be working with a damp cloth. This will help remove any dirt or dust interfering with the sealant.
If your pipes are exposed, you will need to protect them from the sealant. You can do this by wrapping them in tape or newspaper.
If there is a gap between the pipe and the wall, fill it with caulking. Make sure to use silicone-based caulking for best results.
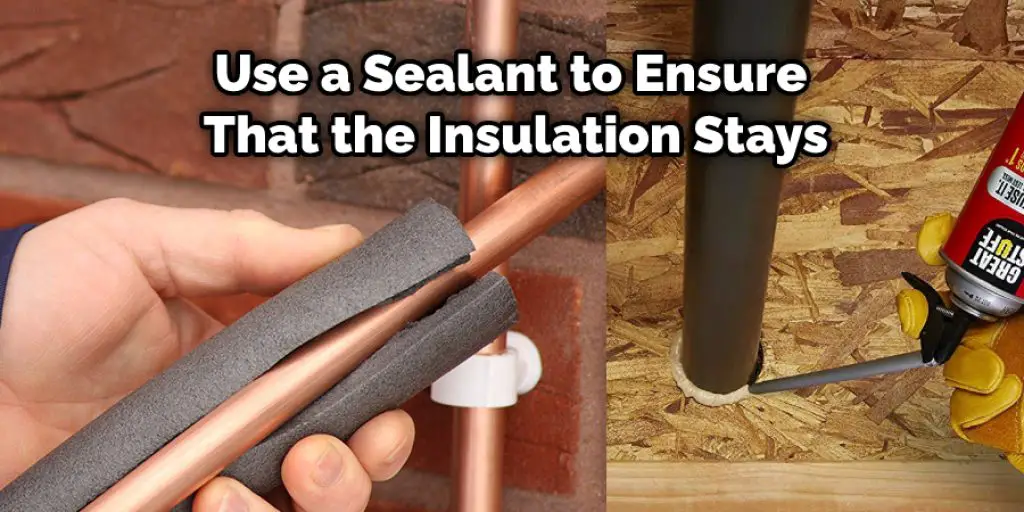
Step 5: Apply the Sealant
After filling all of the gaps, use a sealant to ensure that the insulation stays in place and does not fall out. There are many different types of sealants available, so be sure to select the one that is best suited for your needs. Most sealants can be applied with a brush or a roller, and most of them will dry within minutes. Make sure to read the instructions on the sealant container carefully to ensure that you are using it correctly.
Be sure to apply a good coat of sealant to all of the gaps, and allow it to dry completely before turning on the heat. If you do not take this step, the insulation could fall out and create a safety hazard. Additionally, the sealant will help keep out moisture and pests, which can also damage the pipes.
Step 6: Final Inspection
Once the insulation and sealant are in place, it’s time for a final inspection. Ensure no gaps or holes in the insulation and apply the sealant correctly. You can turn on the heat and enjoy your new, energy-efficient heating system if everything looks good! These steps will help in how to fill gaps around heating pipes.
If you’re having any trouble with the installation process, or if you have any questions, be sure to consult a professional installer. They will be able to help you get your system up and running quickly and efficiently.
It’s always a good idea to check the seals around your heating pipes every year to ensure they are in good condition and properly protect your home from heat loss. If you find any gaps, you can use any methods to fill them. By taking care of this small task, you can help keep your home warm and comfortable all winter long.
You Can Check It Out to Hide Drain Pipes in Yard
Tips and Warnings:
Tips:
- If there is a lot of space between the pipe and the wall, you can use expanding foam insulation to fill in the gaps.
- Another option is to cover the pipe with a sleeve made from insulation material. This will help keep the heat in and prevent cold air.
- Ensure that you don’t block any vents or fans on the heating unit with insulation or other materials. This could cause overheating and damage to the unit.
- If you are using insulation around your pipes, it’s essential to check it regularly and make sure it is still in good condition. Damaged or wet insulation can be a fire hazard.
Warnings:
- Be careful when working with insulation around heated pipes. If the insulation gets too close to the line, it can catch fire.
- Never block vents or fans on your heating unit with insulation or other materials. This could cause overheating and damage to the unit.
- Check your insulation regularly for damage or wetness. Damaged or wet insulation can be a fire hazard.
- If you’re looking for ways to keep your home warm this winter, consider insulating your heating pipes. Insulation can help prevent heat from escaping through the walls and ceilings of your home, and it can also help keep your heating unit running more efficiently.
Benefits of Fill Gaps Around Heating Pipes
One of the main benefits of filling gaps around heating pipes is that it can help keep your home warm. When there are any gaps or holes in your walls, cold air can easily seep in and make your house colder than it should be. By filling these gaps, you can help keep the heat inside your home where it belongs and save on your energy bills.
Another benefit of filling the gaps around your heating pipes is that it can help to prevent water damage. If there are any cracks or holes in your walls, water can easily leak through and cause damage to your home. By filling these gaps, you can help prevent water damage and keep your home in better condition.

Lastly, filling the gaps around your heating pipes can help to improve your home’s insulation. When there are gaps in your walls, it can be challenging to keep the heat in your home. By filling these gaps, you can improve your home’s insulation and keep the heat where it belongs. This can lead to lower energy bills and a more comfortable home overall.
You Can check it Out to Clean Dishwasher Heating Element
Can Expanding Foam Damage Heating Pipes as It Hardens?
There is a potential for expanding foam to damage heating pipes as it hardens if it comes into direct contact with the pipes. As the foam expands and solidifies, it can generate significant pressure, which could potentially crush, dent or break the pipes. Additionally, if the foam is not applied correctly or in excess, it can block or restrict the flow of water through the pipes causing damage. It’s always important to take proper precautions when using expanding foam around heating pipes to prevent any potential damage.
Is Expanding Foam Suitable for Use Around Heating Pipes?
Expanding foam can be suitable for use around heating pipes, but choosing the correct type of foam is important. Look for a foam that is specifically designed for high-temperature applications, as ordinary foam can melt when exposed to heat.
Additionally, ensure that the foam is fire-resistant, as a fire near heating pipes can quickly spread. When applying the foam, do not block any air vents or gaps necessary for proper ventilation, as this can create a fire hazard or cause problems with the heating system. Always read the manufacturer’s instructions carefully and follow all safety precautions.
Conclusion
If you’re having trouble with gaps around your heating pipes, don’t worry! There are several ways to fix the issue and get your home back to a comfortable temperature. Try one of these solutions today and rest easy knowing that your pipes are appropriately insulated. Thanks for reading! We hope this article on how to fill gaps around heating pipes was helpful and that you’re now able to fill in any gaps around your heating pipes.
You Can check it Out to Purge Air Out of a Radiant Heating System