
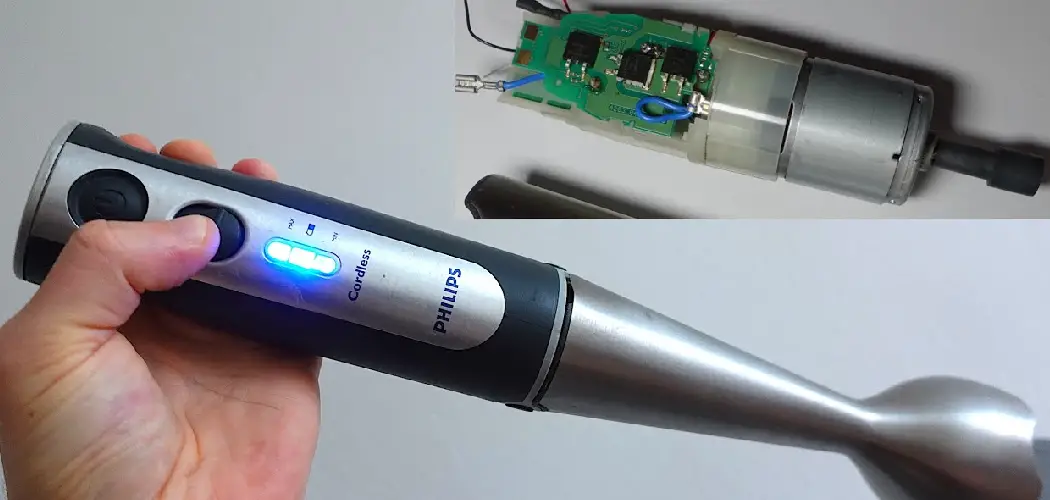
A Waring immersion blender is a handheld kitchen appliance used to blend ingredients or purée food. The blade of an immersion blender is placed directly into the food, making it ideal for puréeing soups and sauces. Immersion blenders are also convenient for making smoothies and milkshakes.

Waring is a leading manufacturer of small kitchen appliances, and their immersion blenders are known for their quality and durability. The Waring Pro Professional Immersion Blender is a popular model that features a powerful 300-watt motor and a stainless steel blending shaft.
In this blog post, we will show you how to take apart a Waring immersion blender. This can be helpful if you need to clean it or if it is not working properly and needs to be serviced. Keep in mind that this process can vary depending on the immersion blender model that you have, so be sure to consult your owner’s manual if you are not sure how to proceed. You will need a Phillips head screwdriver and a putty knife to start. Let’s get started.
What Is the Difference Between a Hand Blender and an Immersion Blender?
When it comes to kitchen appliances, there are many different options out there to choose from. If you’re looking for a versatile tool that can help you with a variety of tasks, then you may be wondering if a hand blender or an immersion blender is the right choice for you. So, what’s the difference between these two types of blenders?
A hand blender, also known as a stick blender, is a handheld kitchen appliance that can be used for a variety of tasks. It typically has a cylindrical body with a blade attached to the bottom. Hand blenders are ideal for blending soups, sauces, and other smoothie-like beverages.
On the other hand, an immersion blender is a kitchen appliance that is designed to be submerged in food or liquid to blend it. Immersion blenders are often used to make smoothies and pureed soups. They can also be used to froth milk for lattes and cappuccinos.

So, which type of blender is right for you? If you’re looking for a versatile appliance that can handle various tasks, then a hand blender may be the better choice. However, if you’re specifically looking for a tool to help you make smoothies or pureed soups, an immersion blender would be better.
Step by Step How to Take Apart a Waring Immersion Blender
1. Unplug the Immersion Blender.
The first thing you need to do is unplug your immersion blender from the electrical outlet. Once it is unplugged, you can proceed to the next step. If your immersion blender has a detachable power cord, you can also remove it at this time.
2. Remove the Blending Shaft.
Next, you will need to remove the blending shaft from the immersion blender. To do this, first, unscrew the retainer nut that is holding the shaft in place. Once the retainer nut is removed, you can pull the shaft out of the blender. Next, remove the O-ring that is located on the shaft. The O-ring helps to create a seal between the shaft and the blender, so be sure not to lose it.
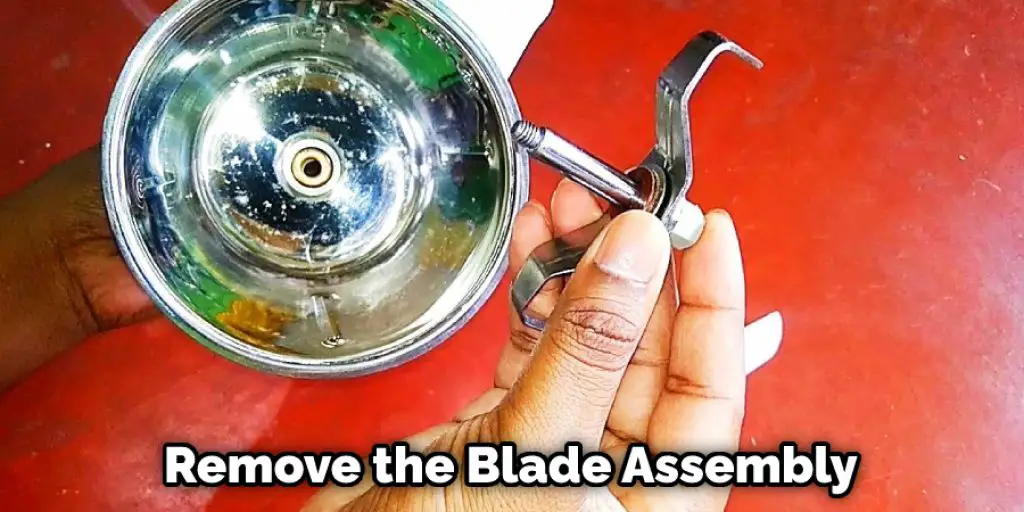
3. Remove the Blade Assembly.
The next step is to remove the blade assembly from the immersion blender. To do this, first, unscrew the retaining ring that is holding the blade in place. Once the retaining ring is removed, the blade assembly can be pulled out of the blender. If the blade is stuck, you can use a small flathead screwdriver to help pry it out.
4. Unscrew the Motor Housing.
Using a Phillips screwdriver, remove the screws from the motor housing. This will give you access to the motor and blades. Be careful not to lose any of the screws. If your blender has a detachable shaft, you can remove it by pulling it out at this point.
5. Remove the Motor.
Carefully remove the motor from the housing. Four screws hold it in. In addition, there are 2 Phillips head screws on the top of the motor and two hex head screws on the bottom. Remove all four screws and carefully pull the motor out of the housing. The wires may still be attached to the motor, so be careful not to pull too hard.
6. Remove the Gearbox Assembly.
Start by unscrewing the two screws that hold the gearbox assembly in place. Once the screws are removed, pull the gearbox out of the blender. If the gearbox is stuck, you can use a flathead screwdriver to pry it loose.
7. Remove the Lower Housing.
Remove the two screws holding the lower housing in place. These are located on the back of the blender, near the bottom. Once these are removed, the lower housing can be pulled away from the rest of the blender.
8. Remove the Upper Housing.
Using a Phillips screwdriver, remove the two screws that hold the upper housing in place. You may need to use a knife or other flat object to pry the housing off. If the housing is stuck, try heating it with a hair dryer for a few seconds.

9. Clean All of the Parts.
Now that you have all of the parts to your Waring immersion blender, it is time to clean them. Start by rinsing all of the parts in warm water. If there are any stubborn stuck-on bits, use a mild soap and a soft brush to remove them. Once all of the parts are rinsed, it is time to sanitize them. You can do this by boiling all of the parts in water for 5 minutes or soaking them in a bleach solution for 10 minutes. Before using them again, be sure to rinse the parts thoroughly with clean water.
10. Plug in the Immersion Blender and Test It Out.
Make sure to plug in the immersion blender and test it out before you put it away. You don’t want to have to go through the process of taking it apart and putting it back together again if you don’t have to. If everything seems to be working properly, then you can safely store it away.
Troubleshooting
If your immersion blender is not working properly, you can do a few things to troubleshoot it.
- Check the power source. Make sure the immersion blender is plugged into an outlet and that the outlet is working.
- Check the blade. Ensure the blade is properly attached and that there are no cracks or damage.
- Check the motor. Make sure the motor is not overheated and that there is no damage.
- Check the speed settings. Make sure the speed setting is appropriate for the task you are trying to do.
- Check the warranty. If your immersion blender is still not working properly, you may be able to get a replacement or repair under warranty.

Tips and Warnings on How to Take Apart a Waring Immersion Blender
Tips
- If your immersion blender has a detachable shaft, unscrew the blade end cap and remove the shaft.
- Unscrew the housing at the top of the motor and carefully pull it away from the rest of the blender.
- The stator and rotor will now be exposed. The stator is the stationary part of the motor, and the rotor is the part that rotates.
- To remove the stator, unscrew the two screws that hold it in place and carefully pull it out.
- The rotor can now be removed by pulling it out of the housing.
Warnings
- Be careful not to lose any of the small parts when taking apart your immersion blender.
- Do not attempt to repair your immersion blender if you are not familiar with electrical appliances. Seek professional help if needed.
- Always unplug your immersion blender from the power outlet before disassembling it.
- Be careful not to damage any of the parts when taking apart your immersion blender.
- Always reassemble your immersion blender in the reverse order of disassembly.
- Do not use your immersion blender if it is not working properly. Seek professional help if needed.
- Always read the instruction manual that came with your immersion blender before using it.
Conclusion
This article has shown you how to take apart a Waring immersion blender. This is a relatively simple process that can be completed in just a few minutes. If you are looking for a comprehensive guide on how to take apart a Waring immersion blender, look no further. In this article, we have outlined the steps required to disassemble the device and provide some troubleshooting tips if you encounter any problems.
We hope that this information proves helpful and allows you to get your immersion blender back up and running as quickly as possible. Have you ever had to take apart an immersion blender? What was your experience? Let us know in the comments section below.