
Windows are a great way to add natural light and ventilation to a room, but they can also be challenging to tile around. In addition, it can be difficult to keep the tiles straight and even without trim. In this post, we’ll show you how to tile around a window without trim using simple techniques that will give you beautiful results.

Why Should You Tile Around a Window without Trim?
One of the benefits of tiling around a window without trim is that it can help to make a space feel more open and spacious. Tiles can also help to reflect light, making a room appear brighter and more welcoming. In addition, tiling can be a relatively easy and inexpensive way to update the look of a room. When choosing tiles for around a window, it is important to consider the style of the room and the amount of natural light that enters the space.
High-gloss tiles can help to reflect light, while matte tiles can help to create a more subdued look. With so many options available, it is easy to find tiles that will complement any décor. So whether you are looking for a fresh new look or simply want to update an old space, tiling around a window is an excellent option.
How to Tile Around a Window without Trim: The Step-by-Step Guide
Step 1: Choose the Right Tile
If you’re tiling around a window, you’ll want to choose a tile that’s easy to cut and shape. Glass mosaic tiles are a good option because they’re easy to work with and look great. Just make sure you use tiles that are specifically designed for use in wet areas like bathrooms.
Step 2: Measure Twice, Cut Once
Before you start cutting any tile, it’s important to measure the area around the window carefully. That way, you’ll know exactly how much tile you need to cut and how to position it correctly. Once you’ve measured the area, use a pencil or chalk to mark where you need to make your cuts.
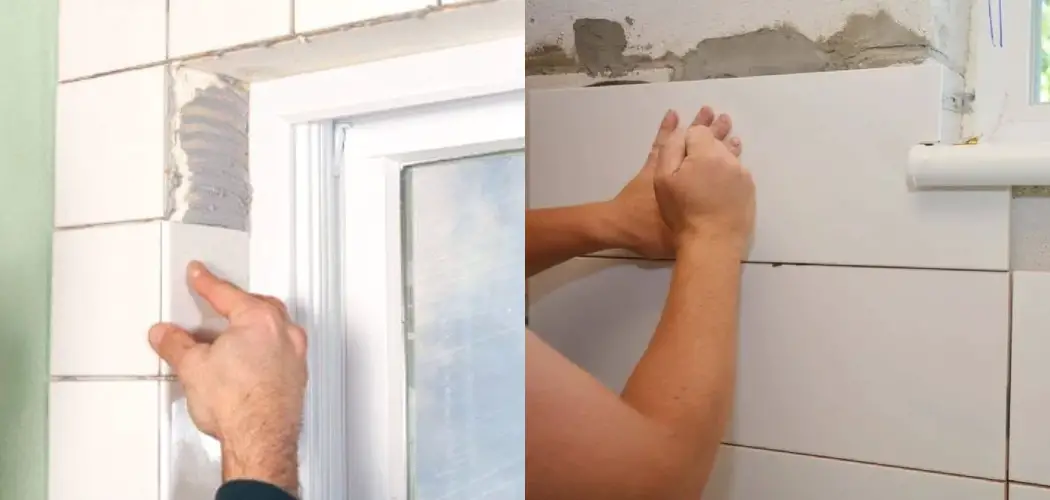
Step 3: Use Tile Adhesive

Once you’ve cut your tile, it’s time to apply the adhesive. First, spread the adhesive evenly over the back of the tile using a notched trowel. Then, press the tile into place and gently wiggle it until it’s secure. For best results, let the adhesive dry for at least 24 hours before grouting the tile.
Step 4: Grout the Tile
After the adhesive has had time to dry, it’s time to grout the tile. Mix the grout according to the manufacturer’s instructions and then spread it into the cracks between the tiles with a rubber float. Use a damp sponge to remove any excess grout from the surface of the tiles.
Step 5: Caulk the Window
Once the grout has had time to dry, you can caulk the window. This will help seal the space between the tile and the window and give your project a professional finish. Use a small bead of caulk around the perimeter of the window, and then smooth it out with your finger.
Step 6: Apply Sealant
After the caulk has had time to dry, you can apply a sealant to the tile. This will help protect the tile from water damage and make it easier to clean. Just be sure to follow the manufacturer’s instructions for how long to let the sealant dry before using the shower or tub.
Step 7: Enjoy Your New Tile!
Now that you’ve finished tiling around your window, it’s time to enjoy your new bathroom! Just be sure to keep up with regular cleaning and maintenance, and your tile will continue to look great for years to come.
That’s it! You’ve now learned how to tile around a window without trim. Just follow these steps, and you’ll be sure to get professional-looking results.
Can You Tile Around a Window Without Trim?
When tiling around a window, there are a few things to remember. First, you’ll want to ensure that the tiles are cut to fit the window’s dimensions. You’ll also want to use a waterproof sealant around the edges of the window to help prevent water damage. Finally, you may want to consider adding trim around the edges of the window for aesthetic purposes.
However, it is possible to tile around a window without trim, and many people find that it gives their home a more modern look. When tiling without trim, be sure to use larger tiles and leave a significant amount of space between the tiles and the edge of the window. This will help prevent water damage and give your home a sleek, contemporary feel.
What Is the Easiest Way to Tile Around a Window Without Trim?
One of the easiest ways to tile around a window is to use a three-inch border. This type of border provides plenty of space for the tiles while allowing some movement. Another advantage of this approach is that it is relatively easy to cut the tiles to fit the border. However, one downside is that the border can be visible if not aligned correctly.
Another option is to use trim(optional). This approach can give the window a cleaner look, but it can be more difficult to install. Trim also requires more maintenance, as it needs to be regularly caulked and painted. Ultimately, the best option depends on your personal preferences and the difficulty level you are willing to take on. Keep reading for more information about how to tile around a window without trim.
What Kind of Tiles Can I Use Around a Window Without Trim?
When it comes to tiling around a window, there are many different options to choose from. However, not all tiles are created equal, and some are better suited for use around a window than others. One type of tile that can be used around a window without trim is subway tile. Subway tile is a versatile option that can be used in various design styles. Plus, the simple rectangular shape of subway tile makes it easy to install around a window.

Another type of tile that can be used around a window without trim is glass tile. Glass tile offers a unique look that can add personality to any space. However, glass tile can be more difficult to install than other types of tile. If you’re looking for a stylish and easy installation tile, subway tile is a great option.
Can I Use Grout or Caulk Around a Window Without Trim?
If you’re planning to install a new window or replace an existing one, you may wonder if you can use grout or caulk around the frame. The answer depends on the type of window and the trim you’re using. For most windows, grout or caulk can be used without trim. However, if you’re using a decorative trim, installing it first and then applying grout or caulk around the edges is best.
This will ensure a clean, finished look. When caulking around a window, always use a high-quality caulking compound designed for use with windows. This will ensure a watertight seal that will last for many years.
What Are the Benefits of Tiling Around a Window without Trim?
When it comes to tiling around a window, there are two main schools of thought. Some homeowners prefer to tile up to the window trim, while others opt to stop the tile before reaching the trim. So, what are the benefits of tiling around a window without trim? One of the biggest advantages is that it can help to make a small room look larger.
The continuous line of the tile creates the illusion of more space, whereas stopping at the trim can break up the room and make it feel smaller. In addition, tiling without trim can help to create a cleaner look. When tile meets trim, there is often a visible line where the two materials meet. By eliminating the trim, you can create a seamless look that is much easier to clean.
Finally, tiling without trim can be a more cost-effective option. Trim is often made from expensive materials like wood or metal, so eliminating it can help to keep costs down. Whether you’re trying to save money or create a more spacious feel, tiling around a window without trim is always worth considering.
How Do I Make Sure My Tiles Are Level when Tiling Around a Window without Trim?
When tiling around a window, it’s important to ensure your tiles are level. Otherwise, the window will look crooked and unfinished. The best way to do this is to use a laser level. First, set up the laser level on a tripod to point directly at the center of the window. Then, place a tile at each window corner and align it with the laser beam.
Once all four tiles are in place, use a spirit level to check that they’re all level with each other. If they’re not, adjust the tiles until they are. Then, apply tile adhesive and grout as normal. With a little time and patience, you can achieve a professional-looking finish.
Conclusion
If you’re looking for a creative way to add interest around your windows, tiling is a great option! With no trim required, this method is simple and easy to do. Plus, it’s a great way to show off your unique style. So get creative and experiment with different tile patterns and colors to create a look that’s all your own. Thanks for reading our post about how to tile around a window without trim.
Michael has always been interested in security and safety. When he was younger, he loved reading books about espionage and crime. This led him to develop a fascination with surveillance systems and home security systems.
He has 8 years of expertise installing, fixing camera problems and door locks. He also gained knowledge by helping homeowners to stay safe and secure in their homes.
Over the years, Michael has gained a great deal of experience in this field. He is responsible for the content development on this blog.