
Are you tired of having a smelly dryer every time you do your laundry? Perhaps you’ve noticed an unpleasant odor from your machine, or your clothes just don’t smell fresh after they come out.

A smelly dryer can be both an inconvenience and a cause for concern, as it can indicate underlying issues such as mold, mildew, or lint buildup. Before you reach for costly professional solutions or consider replacing your dryer, there are several steps you can take to tackle the odor yourself.
In this guide on how to fix smelly dryer, we’ll explore practical tips and techniques to identify the source of the unpleasant smell and effectively eliminate it, ensuring your dryer is both clean and efficient. From routine maintenance to deep cleaning methods, addressing a smelly dryer is often more straightforward than it initially seems.
What Will You Need?
Before diving into the steps to fix a smelly dryer, it’s important to have the right tools and materials. Depending on the cause of the odor, you may need some or all of the following items:
- Mild detergent
- Distilled white vinegar
- Baking soda
- Bleach (if applicable)
- A clean cloth or sponge
- Rubber gloves
- Vacuum cleaner with hose attachment
Once you have everything ready, let’s get started!
10 Easy Steps on How to Fix Smelly Dryer
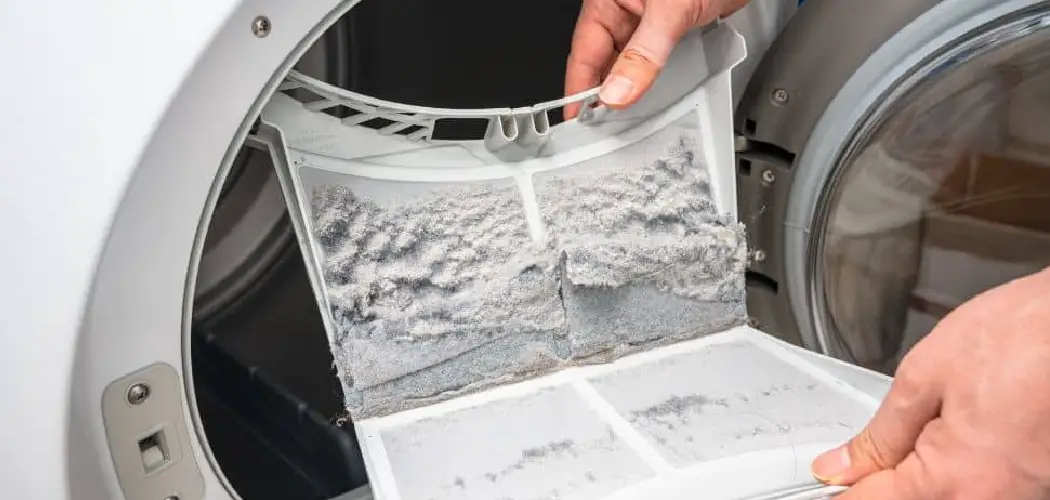
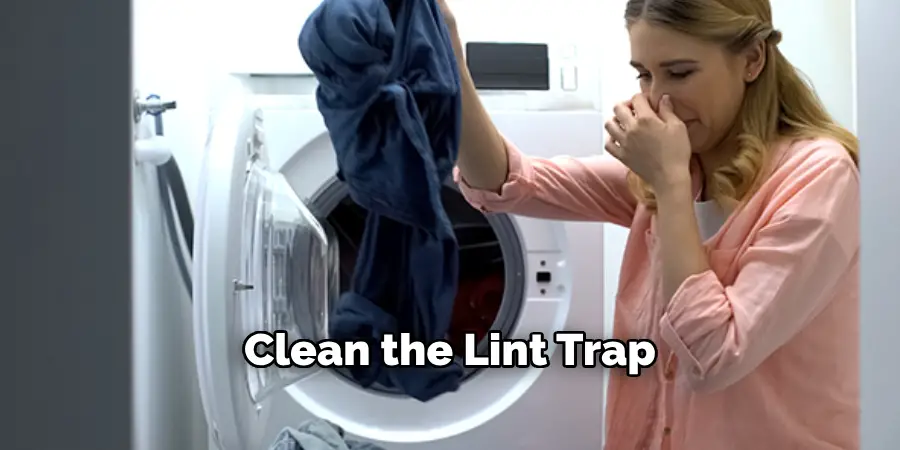
Step 1: Clean the Lint Trap
Begin by removing the lint trap from your dryer. This component is crucial for catching lint and debris during drying, but it can accumulate residues over time. Carefully remove any visible lint by hand, ensuring it is disposed of properly. Once the bulk of the lint is removed, take the lint trap to a sink. Under warm water, use a soft brush or an old toothbrush to gently scrub away any remaining lint and detergent residue.
For a more thorough clean, apply a small amount of mild detergent to the brush and continue scrubbing, paying special attention to the mesh areas where build-up often occurs. Rinse thoroughly to remove any soap residue. Once clean, set the lint trap aside to air dry completely before reinserting it into your dryer.
Step 2: Inspect and Clean the Drum
With the lint trap cleaned and set aside, turn your attention to the dryer drum. Over time, residue from dryer sheets, fabric softeners, and detergents can build up on the interior surfaces of the drum. Start by visually inspecting the drum for any prominent spots or residues that might contribute to odor. Using a clean cloth or sponge dampened with a solution of distilled white vinegar and water, wipe down the entire interior of the drum. Vinegar is a natural deodorizer and will help neutralize any lingering smells.
For stubborn residues, sprinkle baking soda on the damp cloth or sponge and gently scrub the affected areas. Once you’re satisfied that the drum is clean, take an additional pass with a dry cloth to remove any moisture. This combination of cleaning methods should significantly reduce odors and prevent the transfer of smells to your freshly laundered clothes.

Step 3: Deep Clean the Vent System
A significant source of dryer odors can often be traced to the vent system, where lint and debris accumulate over time. First, unplug your dryer from the power supply to ensure safety. Carefully detach the vent hose from the back of the dryer. Using a vacuum cleaner with a hose attachment, thoroughly vacuum both the vent hose and the vent pipe leading outside.
Be sure to remove as much lint as possible, as this buildup can trap odors and pose a fire hazard if not maintained. If needed, use a long brush designed explicitly for dryer vents to reach deeper sections and dislodge stubborn lint. After vacuuming, reattach the vent hose securely and plug the dryer back in. Regular maintenance of the vent system helps eliminate unpleasant smells, boosts drying efficiency, and decreases the risk of fire.
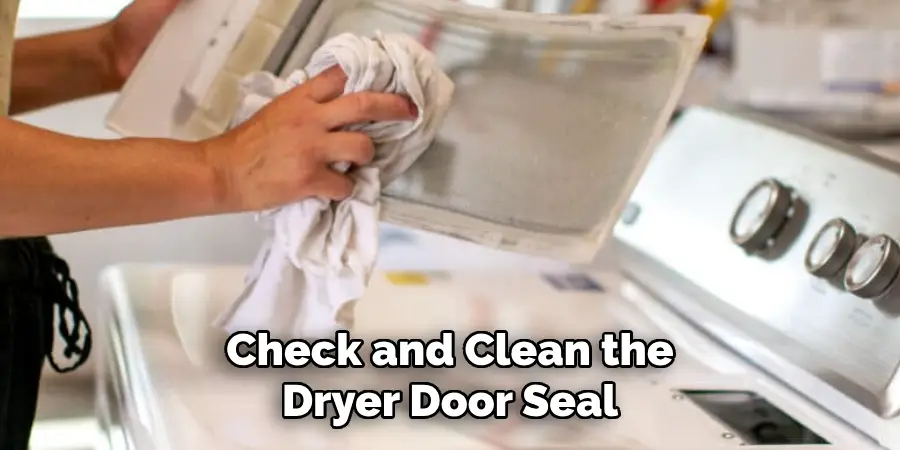
Step 4: Check and Clean the Dryer Door Seal
Another potential source of unwanted odors is the dryer door seal. This rubber gasket can trap lint, dirt, and moisture, leading to musty smells. Start by inspecting the seal for any visible debris or residues. Use a damp cloth or sponge with mild detergent to clean around the entire seal, ensuring it gets into any folds or crevices where buildup might occur. Gently scrub these areas to remove any dirt and lint trapped in the seal. After cleaning, wipe down the seal with a dry cloth to remove any remaining moisture.

Step 5: Clean the Moisture Sensor
The moisture sensor in your dryer helps detect when your clothes are dry, automatically adjusting the cycle time to ensure efficiency. However, fabric softeners and detergent residues can coat the sensor over time, affecting its accuracy and potentially causing odors. To clean the moisture sensor, first locate it inside the dryer drum—typically it’s mounted on the back wall or near the lint trap. Using a clean cloth or sponge dampened with vinegar and water solution, gently wipe the sensor to remove any build-up.
For stubborn residues, use a non-abrasive cleaner or baking soda paste with a soft brush, ensuring you do not scratch or damage the sensor. Once cleaned, dry the area thoroughly with a cloth to eliminate any lingering moisture. Regularly cleaning the moisture sensor helps maintain efficiency, reduces odors, and prolongs the life of your dryer.
Step 6: Refresh with Bleach (If Applicable)
A bleach rinse might be necessary if your dryer still emits strong odors despite cleaning. Power off your dryer and ensure the drum is empty. Prepare a solution of half a cup of bleach diluted in a gallon of water. Wearing rubber gloves to protect your hands, dip a clean cloth or sponge into the solution and gently wipe the interior surfaces of the drum. Bleach is highly effective at eliminating bacteria and mold, which can be sources of strong odors.
After treating all interior surfaces, leave the dryer door open to allow it to air out completely. Before using your dryer again, run an empty cycle on the hottest setting to ensure any bleach residue is removed, preventing damage to your clothes.
Step 7: Prevent Future Odors with Proper Usage
Adopt proper usage habits to maintain a fresh and odor-free dryer. After each drying cycle, promptly remove clothes to prevent moisture build-up and odor development. Leaving the dryer door slightly ajar between uses allows air circulation, helping to evaporate any residual moisture. Regularly clean the lint trap after every load to ensure efficient airflow and reduce lint accumulation. Consider using dryer balls or unscented dryer sheets to minimize the risk of residues contributing to odors.
Step 8: Final Check and Routine Maintenance
Regular maintenance and inspection of your dryer are crucial to ensuring it remains odor-free and operates efficiently. Once a month, conduct a thorough cleaning routine, including checking for lint buildup around the machine, ensuring the drum and door seal are clean, and verifying the vent system’s optimal condition. Additionally, constantly monitor the dryer for strange noises or excessive heat, which could indicate a malfunction requiring professional attention.
Step 9: Consider Professional Cleaning Services
If following all the previous steps hasn’t entirely eradicated the unpleasant odors from your dryer, or if the appliance hasn’t been cleaned in a long time, consider hiring a professional cleaning service. Experts have specialized tools and expertise to thoroughly clean components that are difficult to access, such as internal ducts and drum components. They can also diagnose any underlying problems you might not have noticed.
Professional maintenance not only ensures a fresh and efficient dryer but also can help prevent long-term issues, extending the lifespan of your appliance. Depending on usage and environmental factors, scheduling a professional cleaning once or twice a year can be a worthwhile investment to maintain optimal dryer performance.
Step 10: Ensure Proper Ventilation in the Laundry Area
Proper ventilation in the laundry area is crucial for optimal dryer performance and to keep odors at bay. An airing system that efficiently circulates air helps disperse moisture and reduces the risk of mold and mildew development. Inspect and clear any obstructions from ventilation openings and pathways to guarantee adequate airflow. If your laundry space lacks windows or adequate natural ventilation, consider installing an exhaust fan to boost air circulation. Regularly check for issues such as blocked vents or screens and repair them promptly.
By following these steps, you can eliminate unpleasant odors from your dryer and maintain its optimal performance. Regular maintenance and proper usage habits ensure an efficient, long-lasting appliance that keeps your clothes fresh and dry.
Conclusion
After following these comprehensive steps on how to fix smelly dryer, you should be able to effectively tackle and eliminate any unpleasant odors emanating from your dryer. Maintaining this odor-free condition in the long term relies on regular cleaning and attentiveness to proper usage habits.
By incorporating routine checks and addressing issues promptly, you not only enhance the efficiency and performance of your dryer but also extend its lifespan. Should issues persist despite diligent efforts, professional cleaning services offer a thorough solution that tackles deeper problems in inaccessible areas.
Ultimately, a fresh-smelling, well-maintained dryer contributes significantly to the overall quality of your laundry experience, ensuring your clothes come out perfectly clean and odor-free.
About
Angela is the chief editor of Indoorense. She began her career as an interior designer before applying her strategic and creative passion to lifestyle and home.
She has close to 15 years of experience in creative writing and online content strategy for housekeeping and cleaning,home decorations as well as other efforts.
She loves her job and has the privilege of working with an extraordinary team. She lives with her husband, two sons, and daughter in Petersburg. When she’s not busy working she spent time with her family.