
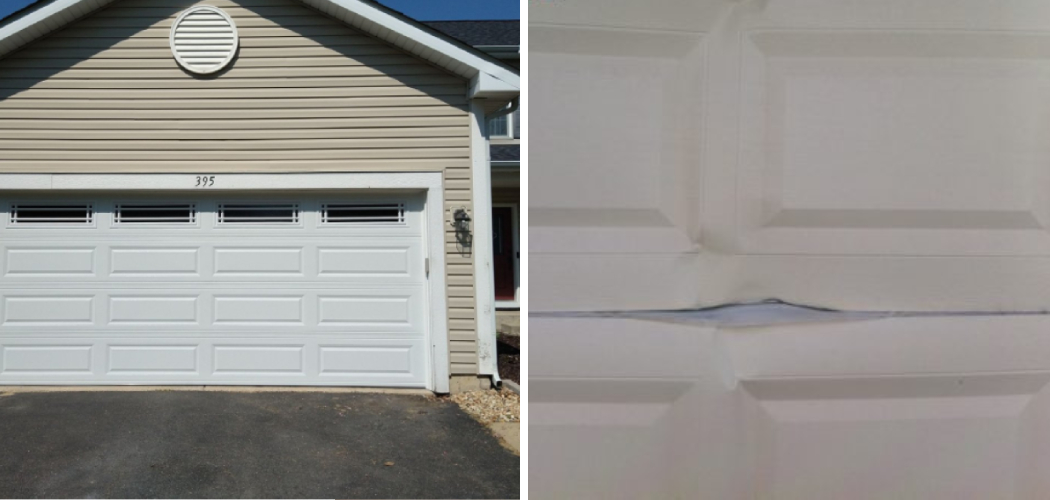
Fixing a hole in your garage door can be a simple and cost-effective solution for keeping the elements, bugs, and other critters out of your home. Ensuring your home is safe from intruders or theft is also important. In addition to these benefits, fixing the holes in your garage door will make it look better and help keep out drafts, making it more energy-efficient.

Repairing a hole in your garage door can save you money and time. Depending on the size of the hole, it is usually much cheaper to repair than replace your garage door. In addition, repairing the hole will take little time and involves simple steps that anyone can complete quickly. By promptly taking care of any holes or other damage, you can avoid any larger problems arising from further damage. In this blog post, You will learn in detail how to fix hole in garage door.
Tools You Will Need
- Garage Door Sealant
- Putty Knife
- Sandpaper
- Screwdriver
- Tape Measure
- Drill with Bits
- Utility Knife or Box Cutter
- Safety Glasses
- Pliers
- Paintbrush and Spackling Paste (if needed)
- Rag (for cleaning up residue)
- Patch or Repair Kit (if needed)
Step-by-Step Processes for How to Fix Hole in Garage Door
Step 1: Inspect the Condition
Take a look at the hole and inspect its condition. If the damage is minor, you must patch it up with a suitable material, such as an epoxy resin or wood filler. You may also need to use a putty knife.
Step 2: Clean the Area
Remove debris and dirt from the area to ensure it is clean and ready for patching. You may also need to sand down the surface around the hole if needed. Apply your chosen repair material – such as an epoxy resin or wood filler – liberally to ensure that all areas of the hole are filled.
Step 3: Let it Dry
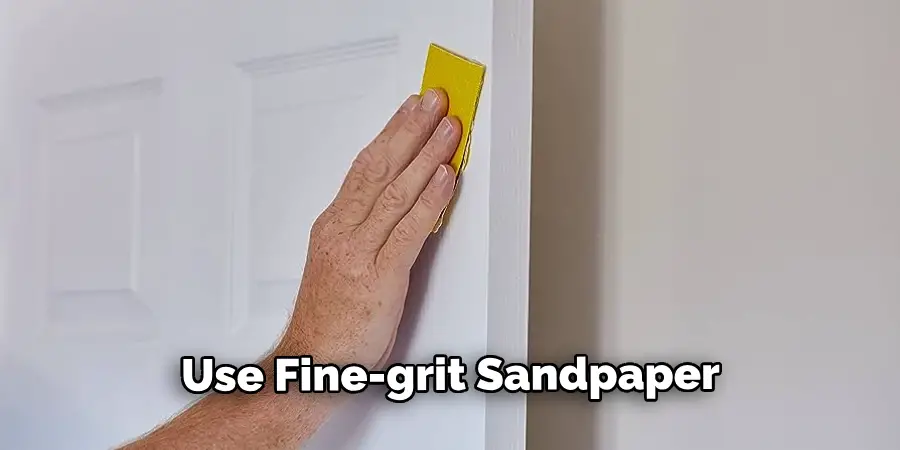
Allow the repair material to dry completely before moving on to the next step. This could take a few hours, depending on the product you used. Once it has dried, use fine-grit sandpaper to lightly sand down the patched area and smooth it.
Step 4: Apply Primer
Once you’ve achieved a smooth surface, apply a primer to help the garage door paint stick better. Allow this to dry completely before starting on the next step. Use a brush or roller to paint the patched area securely. Make sure you match the color of your garage door as best as possible.
Step 5: Let it Dry Again
Allow your newly painted area to dry completely before moving on to the next step. This could take a few hours, depending on the product you used. Once the paint has dried, apply a sealant to help protect the patch and make it less vulnerable to moisture. Allow this to dry as well.
Step 6: Inspect the Repaired Area
Take a look at the repaired area and inspect its condition. If all looks good, your garage door should now be free of any holes. You can now enjoy the peace of mind that your garage door is in good condition and able to perform as it should. With the right repair materials and some guidance, you can quickly fix a hole in your garage door without having to call out a professional.
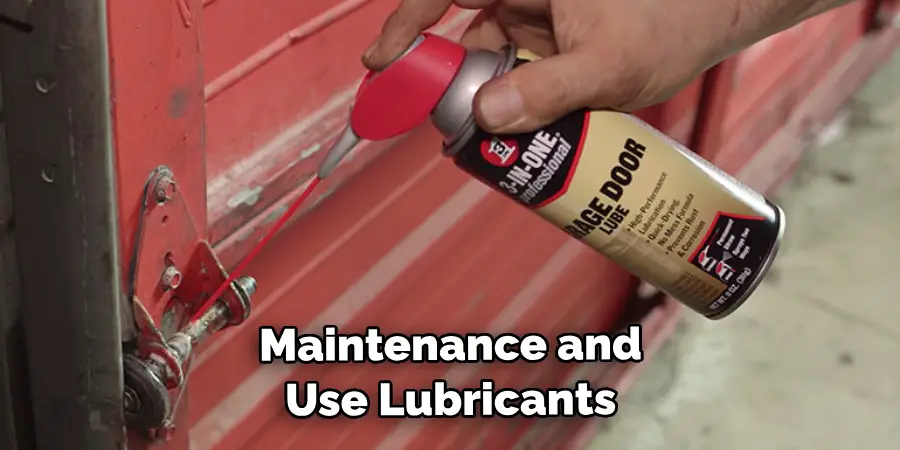
To help prevent further damage, you should lubricate all the moving parts of your garage door regularly. This will ensure that it runs smoothly and can help avoid costly repairs in the future. You should also regularly check for signs of wear and tear and replace worn-out parts as soon as possible.
Safety Tips for How to Fix Hole in Garage Door
- Make sure to disconnect the power from your garage door opener before attempting any repairs on the door itself.
- When handling sharp tools or materials, wear protective gear, such as safety glasses and gloves.
- Ensure that you are secure while working at height by using an appropriate ladder or other platform to access the damaged area of your garage door.
- Secure any exposed hinges or other parts with a clamp to prevent them from moving while you’re working on the door.
- When cutting metal, use special blades and lubricants to reduce heat build-up and eliminate sparks.
- Dispose of all sharp objects, tools, and materials properly after your repair.

By following these safety tips, you can fix your hole in the garage door safely and efficiently. For more information about repairing a damaged garage door, contact the experts at [company name]. We have years of experience helping customers like you with their repair needs.
How Do You Measure the Size of the Hole Before Filling It?
When filling a hole in the garage door, it is important to determine the size of the hole in order to choose the right material for repair. The best way to measure your hole is with a tape measure. Start by measuring from one end of the hole to the other and then measuring from the top to the bottom of the hole. Knowing these measurements will allow you to purchase the right material to fill the hole.
Is There an Easy Way to Patch the Hole Without Replacing the Entire Panel?
Yes. Patching the hole in your garage door is fairly simple and won’t require replacing the entire panel. Here’s how to get started:
- Gather Materials: You’ll need some caulk, sandpaper, wood putty, and painter’s tape.
- Sand Down the Area Around the Hole: Use the sandpaper to file down any rough edges around the hole gently.
- Apply Wood Putty to the Hole: Fill it with wood putty and allow it to dry for 24 hours.
- Sand Down the Newly Applied Putty: Use your sandpaper to smooth out any bumps or imperfections once it’s dried.
- Apply Caulk to the Edges of the Hole: Using painter’s tape, create a border around the edges and apply a bead of caulk to cover any gaps or air bubbles. Allow it to dry for 24 hours.
- Paint Over the Area if Desired: Once everything is dry, you can paint over the area with a primer and the appropriate paint color.
And there you have it! You should now have a properly patched hole in your garage door without replacing the entire panel.
How Should You Sand the Repair Area Before Applying a Finish?
To ensure your garage door repair looks smooth and professional, it’s important to sand the area before applying a finish. Start with 80-grit sandpaper and gently sand down the area around the hole and newly applied putty.
Once you’ve got a nice, even surface, switch to 120-grit paper and give it one more round of sanding. Finally, switch to 220-grit paper and lightly brush away any excess dust or debris. This will help ensure that your final finish looks polished and professional.

What Are the Benefits of Having a Professionally Patched Garage Door?
Having a professionally patched garage door can be beneficial in several ways. First, it will ensure the repair is done correctly and will only need to be redone for a while. It can also boost the overall look of your home, making it more aesthetically pleasing.
Additionally, having a properly patched garage door can help prevent any further damage from occurring, such as rusting or warping. And lastly, a professionally patched garage door provides added safety and security since it can prevent unwanted intruders from entering.
Maintenance Tips for Fixing Hole in Garage Door
- Regularly inspect the door; Check for any signs of damage, such as rust, dents, or holes.
- Keep the weatherstripping in good condition; Replace it if necessary to ensure a tight seal between the door and frame.
- Ensure all screws are tightened securely; Tighten loose screws to prevent unnecessary movement or rattling of the door.
- Clean away dirt and debris; Sweep away any dirt or debris from the track to ensure it operates smoothly.
- Lubricate moving parts; Apply lubricant regularly to all moving parts, such as the hinges, rollers, and opener chain, to keep everything running smoothly.
- Check for proper alignment; Make sure the door is aligned with the track by opening and closing it a few times. If necessary, adjust the alignment so that it runs smoothly.
By following these maintenance tips, you can extend the life of your garage door and ensure that any repairs you do are done correctly and safely. Keeping up with regular inspections and maintenance will help keep your garage door looking and functioning at its best.
What Are Some Common Causes of Damage to a Garage Door?
Damage to a garage door can be caused by several things, such as wear and tear due to regular use, extreme weather conditions, or improper maintenance. It’s important to regularly inspect your garage door for any signs of damage, such as rust, dents, or holes. Additionally, make sure to keep up with regular maintenance and use lubricants on all moving parts to prevent any further damage from occurring.
If you notice any signs of damage, it’s important to act quickly and repair the issue before it becomes a larger problem. Your garage door should last for many years with proper care and maintenance. However, if you must address any damage or repairs, following the above steps can help you do it quickly and correctly.
Conclusion
In conclusion, fixing a hole in your garage door is easier than it may seem. Be sure to measure the hole size before purchasing any necessary items. You should also read up on safety tips like wearing protective gear or having someone help hold heavy objects.
Remember that if you still need more confidence in fixing the hole, it’s always best to seek professional help to get the job done right. Reading this post has helped you learn how to fix hole in garage door. Make sure the safety precautions are carried out in the order listed.
Rick is a handyman who grew up helping his dad with his business. He learned a lot from him about how to fix things, and also about how to work hard and take care of business. These days, Rick is still into fixing things- only now, he’s doing it for a living.
Rick is always looking for new ways to help people grow and develop. That’s why he started contributing to this blog: to share all his experience and knowledge so that he can help people who are interested in DIY repair.