
Maintaining your air conditioner is important to keep it running smoothly and efficiently. One key part of AC maintenance is ensuring the refrigerant level is where it needs to be. If the refrigerant level is too low, it can cause your AC to work harder than necessary, leading to higher energy bills.
Making sure that your AC unit has enough refrigerant is important for maintaining your AC unit and keeping it running smoothly. By following these simple steps, You will learn in detail how to check refrigerant level in air conditioner.
Step by Step Processes for How to Check Refrigerant Level in Air Conditioner
Step 1: Locate The System
The first step is to find your air conditioner. This may be easy or difficult, depending on the location of your unit. Once you have found it, take a look at the outdoor condenser unit.
Step 2: Shut Off The System
Now that you have located the system, the next step is to shut it off. If it is a central air unit, then you will need to shut off the power at the breaker box. If it is a window unit, then you can simply unplug it from the outlet. This will give you access to the coils and other parts of the unit. To do this, simply unscrew the screws that are holding it in place.
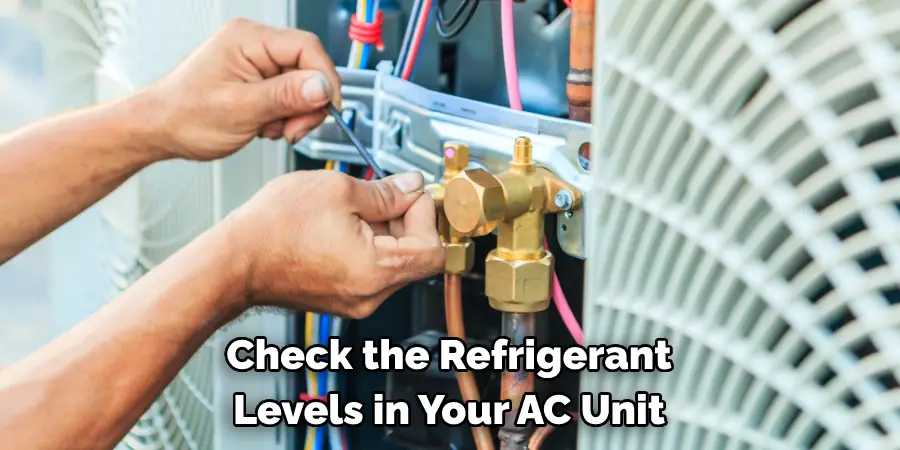
Step 3: Locate The Low Side Service Port
Now that you have access to the coils, the next step is to locate the low-side service port. This is where you will be adding the refrigerant. The low-side service port will have a cap that says “low” or “L.” Once you have located the low-side service port, the next step is to remove the cap. Be careful not to lose the cap, as you will need to put it back on later.
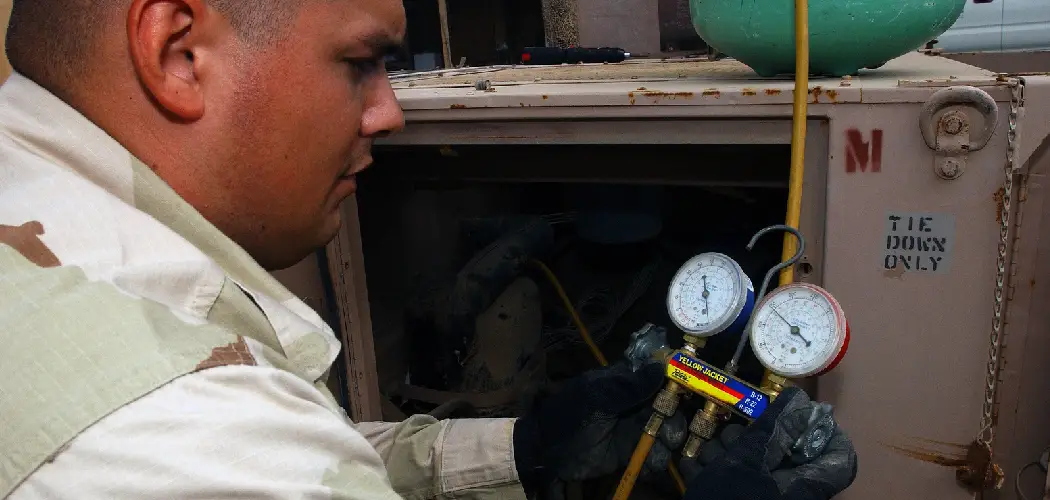
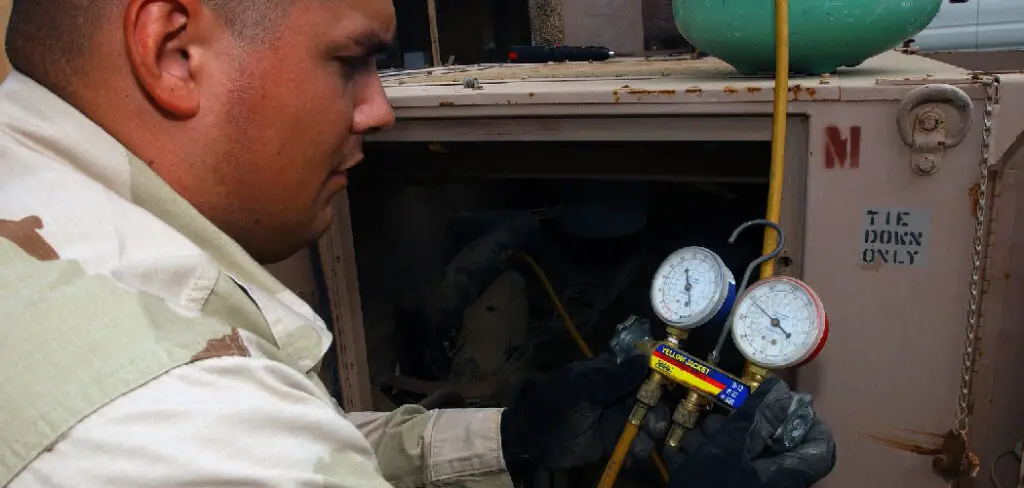
Step 4: Connect The Gauge
The next step is to connect the gauge. The gauge will have a hose that needs to be connected to the low-side service port. Once it is connected, turn on the valve so that refrigerant can flow through the gauge.

Step 5: Check The Gauge Reading
The next step is to check the gauge reading. The reading should be between 30 and 50 psi. If the reading is outside of this range, then you will need to add or remove refrigerant accordingly. Once you have checked the gauge reading, shutting off the valve is next. This will prevent refrigerant from flowing through the gauge.
Step 6: Remove The Gauge
The next step is to remove the gauge from the low-side service port. Be careful not to lose any of the parts, as you will need to put them back on later. The next step is to replace the cap on the low-side service port. This will prevent refrigerant from leaking out.
Step 7: Turn On The System
The next step is to turn on the system. How you do this will depend on the type of system that you have. If it is a central air unit, then you will need to turn on the power at the breaker box. If it is a window unit, then you can simply plug it back into the outlet.
Step 8: Add Refrigerant If Needed
If you find that the system is leaking, then you will need to add refrigerant. How you do this will depend on the type of system that you have. If it is a central air unit, you can add refrigerant using a charging kit. If it is a window unit, you can add refrigerant using a can of refrigerant.
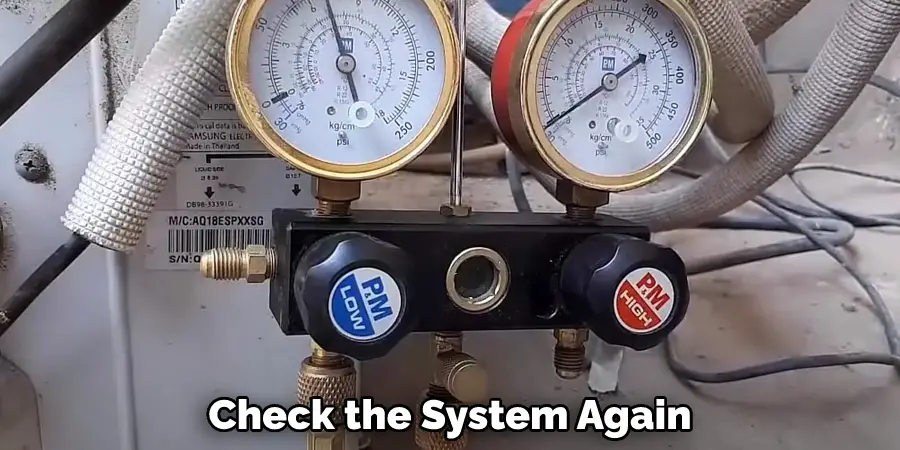
Step 9: Check The System Again
After you have added refrigerant, the next step is to check the system again. How you do this will depend on the type of system that you have. If it is a central air unit, then you can check the system by looking at the compressor. If it is a window unit, then you can check the system by looking at the evaporator coils.
Tips for How to Check Refrigerant Level in Air Conditioner
- Ensure your air conditioner is turned off before you check the refrigerant level. Check the manufacturer’s instructions to see what type of refrigerant your air conditioner uses.
- Locate the low-pressure service port on your air conditioner. This is usually located on the larger of the two copper pipes that come out of the back of the air conditioner.
- If the refrigerant level is low, slowly add more refrigerant to the low-pressure service port until the reading on the pressure gauge is between 25 and 35 psi. Do not overfill the air conditioner with refrigerant. This could damage the compressor.
- Once you have added refrigerant to the air conditioner, turn it on and check to ensure that the evaporator coils are not frozen. If the evaporator coils are frozen, turn off the air conditioner and let it thaw for about an hour before checking the refrigerant level again.
- If the problem persists, call a qualified technician to service your air conditioner and wear protective clothing when working with refrigerant, including gloves, goggles, and a mask.
- Use only EPA-approved refrigerants in your air conditioner, and do not vent refrigerant into the atmosphere. This is illegal and can damage the ozone layer.
- Recycle any refrigerant you remove from an air conditioner and keep flammable materials, such as gasoline, away from your air conditioner while working on it.

How Can You Tell if Your Ac Unit is Leaking Refrigerant?
If you think your AC unit might be leaking refrigerant, there are a few ways you can check. First, take a look at the outdoor unit. If you see any ice or frost on the coils, that could signify a leak. Another way to tell is if your AC unit isn’t cooling your home as well as it used to. Finally, you can check the pressure of your unit using a gauge. If the pressure is low, that could mean there’s a leak.
If you think your AC unit might be leaking, it’s important to fix it as soon as possible. A leak can not only make your AC unit less effective, but it can also be dangerous. Refrigerant is a toxic substance, so if you suspect a leak, it’s best to call a professional to check it out.
What Are the Symptoms of Low Refrigerant in an Air Conditioner?
One of the most common signs that your air conditioner is low on refrigerant is when it stops blowing cold air. If you notice that your AC unit is no longer emitting cool air, it’s likely because the refrigerant levels are too low. Other symptoms of low refrigerant in an AC unit include:
- Short cycling (the AC unit turns on and off more frequently than normal)
- Reduced airflow
- Higher than normal energy bills
If you notice any of these symptoms, it’s important to check the refrigerant levels in your AC unit as soon as possible. Otherwise, you could damage your AC unit or waste a lot of money on unnecessary repairs.
How Often Should You Check Your Air Conditioner’s Refrigerant Level?
It’s important to keep an eye on your air conditioner’s refrigerant level, as it can affect the unit’s efficiency. A good rule of thumb is to check it once a year before the cooling season begins.
If you notice that your air conditioner isn’t cooling as well as it used to, or if it’s making strange noises, it could be a sign that the refrigerant level is low. Checking it is a simple process and can help you avoid more costly repairs down the road.
What Causes Air Conditioners to Lose Refrigerant?
There are a few reasons why your air conditioner may lose refrigerant over time. One common reason is that your unit’s coils may be dirty or damaged, which can cause the unit to work harder and ultimately use more refrigerant.
Another possible reason for the loss of refrigerant is a leak in your AC unit’s line set, which is the line that carries refrigerant between your indoor and outdoor units. If you suspect a leak, you should contact a professional AC repair technician to have it fixed as soon as possible.
Is It Necessary to Call Any Professional to Check the Refrigerant Level in Air Conditioner?
It is normal for an air conditioner to lose some of its refrigerants over time. This is because the refrigerant constantly vaporizes and condenses as it circulates through the system. However, if there is a significant drop in refrigerant levels, it can cause the air conditioner to work less efficiently and may even damage the compressor.
If you suspect that your air conditioner is low on refrigerant, it’s important to have it checked by a professional. They will be able to determine whether or not there is a leak and, if so, repair it. In most cases, it’s best to leave this task to the experts, as handling refrigerants can be dangerous.
How Much Will It Cost if You Hire a Professional?
The cost of hiring a professional to check your air conditioner’s refrigerant level will depend on the type of air conditioner you have and the size of your unit. If you have a central air conditioner, the average cost for this service is between $100 and $200. If you have a smaller window unit, the average cost is between $50 and $100.
While the cost of this service may seem high, it is important to remember that refrigerant is a toxic substance and should only be handled by a trained professional. In addition, if your refrigerant level is low, a professional can properly recharge your system, ensuring that it runs efficiently and keeping your home cool and comfortable all summer long.
Conclusion
Checking your air conditioner’s refrigerant level is an important part of routine maintenance. Low levels can cause your unit to work harder, leading to increased energy costs and shortened lifespan. Fortunately, checking the refrigerant level is a relatively simple task that can be easily completed with a few tools.
Be sure to recycle any leftover refrigerant according to local regulations. With just a little care, you can keep your air conditioner running smoothly for years to come. I hope this article has been beneficial in learning how to check refrigerant level in air conditioner.
Rick is a handyman who grew up helping his dad with his business. He learned a lot from him about how to fix things, and also about how to work hard and take care of business. These days, Rick is still into fixing things- only now, he’s doing it for a living.
Rick is always looking for new ways to help people grow and develop. That’s why he started contributing to this blog: to share all his experience and knowledge so that he can help people who are interested in DIY repair.