

Attaching a trellis to a brick wall can add both aesthetic appeal and functional value to your outdoor space. A trellis provides a framework for climbing plants, offering privacy, shade, and a vertical element to your garden. Whether you’re looking to support vibrant blooms, foster a lush green wall, or simply enhance the visual interest of your property, learning how to securely and effectively attach a trellis to a brick is an essential skill for any homeowner or gardening enthusiast.
In this guide on how to attach trellis to brick wall, we will walk you through the necessary steps and considerations to ensure a successful installation.
Why Attach a Trellis to a Brick Wall?
There are several benefits to attaching a trellis to a brick wall. Some of the most common reasons include:
Vertical Gardening:
A trellis provides an excellent structure for climbing plants, allowing them to grow vertically and take up less space in your garden. This is especially useful for those with limited gardening space.
Privacy and Shade:
By attaching a trellis to your brick wall, you can create a living privacy screen or shade structure. This can be particularly beneficial if you have neighbors close by or want to block out unsightly views.
Visual Interest:
A trellis adds visual interest to an otherwise bare wall, making it an attractive focal point in your outdoor space. It also allows you to incorporate different textures and colors into your garden design.
Needed Materials
Before you begin, make sure you have all the necessary materials on hand. These may include:
Trellis:
You can purchase pre-made trellises or make your own with wood, metal, or PVC pipes. Make sure it is the right size and design for your space and needs.
Brackets or L-brackets:
These will be used to secure the trellis to the brick wall. Choose sturdy brackets that can support the weight of the trellis and any plants growing on it.
Masonry anchors:
These are essential for attaching the brackets to the brick wall. Make sure to use anchors specifically designed for masonry.
Drill and drill bits:
A power drill will make the installation process much easier and quicker. Make sure you have the right size drill bit for your masonry anchors.
Level:
This will help ensure that your trellis is straight and properly aligned on the wall.
Pencil:
Use a pencil to mark where you will be drilling holes for the brackets and anchors.
Safety gear:
Always wear safety goggles and gloves when working with power tools and masonry.
8 Steps on How to Attach Trellis to Brick Wall
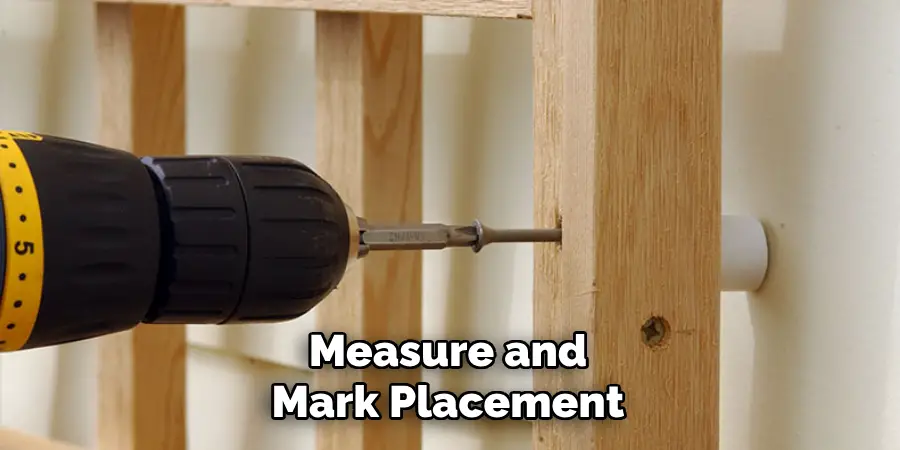
Step 1: Measure and Mark Placement
Start by determining the exact location on the brick wall where you want to attach the trellis. Use a tape measure to find the desired height and width for the trellis, ensuring it fits the available space and aligns with your gardening goals. Hold the trellis against the wall and use a level to confirm it is straight.
Once you have the perfect placement, use a pencil to mark the spots where the brackets will be installed. Make sure these marks are evenly spaced and in line with the structural elements of the trellis. Taking precise measurements and marking accurately will help ensure a secure and aesthetically pleasing installation.
Step 2: Drill Holes for Anchors
With your bracket placement marked on the brick wall, it’s time to drill the holes for the masonry anchors. Begin by fitting your power drill with the appropriate drill bit size for the anchors you are using. Ensure the drill bit is designed for masonry to prevent damage and ensure precision.
Position the drill bit at the first marked spot and slowly drill into the brick, applying steady pressure. Be careful not to drill too deeply—most masonry anchors require a specific hole depth, often around the length of the anchor. Repeat this process for each marked location, ensuring that the holes are spaced correctly as per your previous measurements.
After drilling, use a brush or a vacuum to remove any dust or debris from the drilled holes, ensuring a clean space for anchor insertion. This thorough preparation will facilitate secure and firm attachment of the brackets to the brick wall.
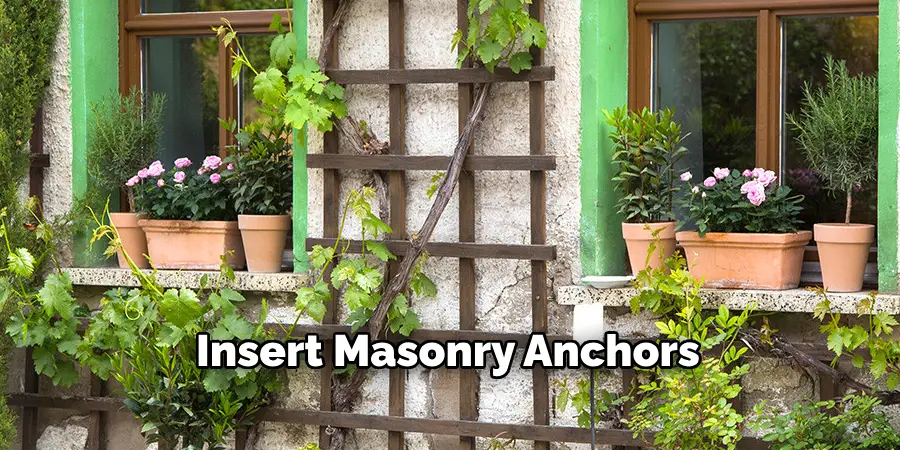
Step 3: Insert Masonry Anchors
After drilling the holes, it’s time to insert the masonry anchors. Begin by tapping each anchor gently into its drilled hole with a hammer. Ensure that they are flush with the wall surface. If you experience any resistance, use a small piece of wood as a buffer between the hammer and the anchor to avoid damaging it.
The purpose of the anchors is to provide a strong and secure base for the brackets, so take your time to ensure they are properly installed.
Step 4: Attach Brackets
Once all the anchors are in place, it’s time to attach the brackets to the brick wall. Hold each bracket up against the wall at its designated location and insert screws through the bracket holes and into the corresponding anchors. Use your drill or screwdriver to tighten them securely, ensuring the bracket is flush against the wall.
Repeat this process for all brackets, making sure they are evenly spaced and securely attached.
Step 5: Add Trellis to Brackets
Now that the brackets are attached to the brick wall, it’s time to add the trellis. Carefully lift and position the trellis onto the brackets, ensuring that it sits securely within them. Use screws or bolts to attach the trellis to each bracket, depending on your chosen design and materials. Make sure to use sturdy hardware that can support both the weight of the trellis and any plants growing on it.
But before securing the trellis, use a level to ensure it is straight and properly aligned.
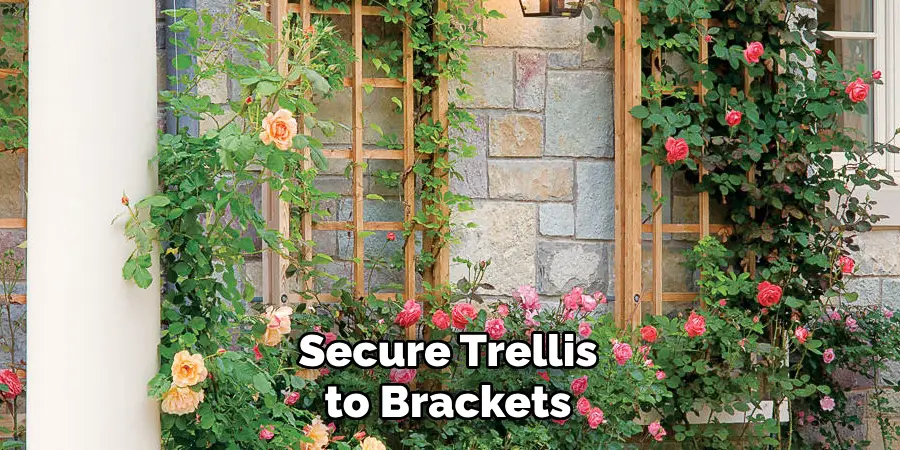
Step 6: Secure Trellis to Brackets
With the trellis in place on top of the brackets, use screws or bolts to secure it firmly in position. Make sure each screw or bolt is tight and that there is no wobbling or movement of the trellis. If necessary, use additional screws or brackets for added stability.
If you are attaching a heavier trellis or planning to grow heavy plants on it, consider adding additional support by attaching cables or wire from the top of the trellis to anchor points on the ground. This will provide extra stability and prevent any damage to your brick wall.
Step 7: Add Plants
Now that your trellis is securely attached to the brick wall, it’s time to add some greenery! Depending on your design and preferences, you can choose climbing vines, flowering plants, or even herbs and vegetables that can thrive in a vertical garden.
Ensure you select plants that are appropriate for your climate and sun exposure, as well as ones with tendrils or branches that can easily attach to the trellis for support.
Step 8: Maintain and Enjoy
Congratulations, your trellis is now successfully attached to your brick wall! Regular maintenance of both the trellis and plants will ensure a long-lasting and beautiful addition to your space. Trim any excess growth and keep an eye out for any damaged or weak components that may need repair or replacement over time. With proper care, your trellis will provide a gorgeous backdrop for your plants and add charm to your outdoor area.
So sit back, relax, and enjoy watching as your garden grows on this newly installed trellis on your brick wall!
Following these 8 steps on how to attach trellis to brick wall will ensure a secure and aesthetically pleasing attachment of a trellis to a brick wall. With careful measurements, proper tools, and sturdy materials, you can create a vertical garden that adds beauty and functionality to your outdoor space. So why wait? Get started on attaching your trellis today and watch as your garden flourishes in a whole new way. Happy gardening!
Frequently Asked Questions
Q: Can I Attach a Trellis to Any Type of Brick Wall?
A: As long as the brick wall is structurally sound, you can attach a trellis to it. However, it’s important to take note of the type of brick wall you have as there are different methods for attaching a trellis to different types of brick walls. For example, if your brick wall is made with thin bricks or has a stucco finish, you may need specialized anchors and screws for proper installation.
Q: Do I Need Special Tools or Equipment to Attach a Trellis to a Brick Wall?
A: While some basic tools like a power drill and screwdriver will be necessary for attaching the brackets and trellis, it’s important to have the appropriate drill bits, anchors, and screws specifically designed for masonry. Using improper tools can result in damage to your brick wall and potentially compromise the stability of your trellis.
Q: Can I Attach a Trellis to a Brick Wall Indoors?
A: Yes, you can attach a trellis to an indoor brick wall as long as it is structurally sound and able to support the weight of the trellis and any plants growing on it. However, proper precautions should be taken in regard to moisture levels and potential damage to the interior walls if watering or plant maintenance is required near the trellis.
Q: How Often Should I Maintain My Trellis?
A: It’s recommended to regularly inspect and maintain your trellis every few months for any signs of damage or weakness. Additionally, regular pruning and trimming of plants on the trellis will help keep it looking tidy and prevent overgrowth that can potentially damage the structure.
Conclusion
Attaching a trellis to a brick wall not only enhances the visual appeal of outdoor spaces but also offers functional advantages, such as supporting climbing plants and maximizing garden space. By following the outlined steps on how to attach trellis to brick wall, you can achieve a sturdy and attractive installation. Start by planning meticulously, ensuring accurate measurements and selection of suitable plants.
As you carry out each step, from securing the brackets to selecting vibrant plants, the addition of a trellis offers an opportunity to express creativity and expand your garden vertically. Whether for aesthetic or practical purposes, the successful installation of a trellis promises to transform your outdoor area into an engaging green retreat.
About
Angela is the chief editor of Indoorense. She began her career as an interior designer before applying her strategic and creative passion to lifestyle and home.
She has close to 15 years of experience in creative writing and online content strategy for housekeeping and cleaning,home decorations as well as other efforts.
She loves her job and has the privilege of working with an extraordinary team. She lives with her husband, two sons, and daughter in Petersburg. When she’s not busy working she spent time with her family.