

Sanding a stair railing is crucial before applying paint or stain, ensuring both aesthetic and functional benefits. By sanding, you smooth out the surface and remove any remnants of old finishes, which allows the new paint or stain to adhere more effectively and last longer. This process also enhances the overall appearance of the stair railing, making it sleek and smooth to the touch while minimizing the risk of splinters or rough edges that can compromise safety.
Wooden railings, in particular, require sanding to bring out their natural grain and texture. Metal railings might also need sanding to eliminate rust or old paint. Gather essential tools such as sandpaper, a sanding block, or an electric sander to embark on this task. Understanding “how to sand stair railing” correctly can greatly enhance the beauty and safety of your home.

Gathering Materials and Tools
Before starting the sanding process, gathering all necessary materials and tools is vital to ensure efficiency and safety. Here’s a comprehensive guide to what you’ll need:
Essential Tools for Sanding:
- Sandpaper in Various Grits: Begin with coarse grit sandpaper (60-80) to effectively remove old finishes, paint, or particularly rough patches. Once the initial sanding is complete, transition to medium-grit sandpaper (120-150) to smooth the surface. Finally, fine grit sandpaper (220) is used for finishing touches to achieve a sleek and polished appearance.
- Sanding Block or Sanding Sponge: These tools are used to hold the sandpaper, making it easier to work on flat surfaces with uniform pressure.
- Detail Sander or Electric Sander (Optional): These can be particularly useful for larger or flat railing sections, as they speed up the sanding process and reduce manual effort.
- Sanding Sponges or Detail Sanding Tools: Ideal for reaching into grooves and curved areas of the stair railing where traditional sandpaper might not easily penetrate.
Other Materials You’ll Need:
- Drop Cloths or Plastic Sheeting: These can protect your floors and stairs from dust and debris generated during the sanding process.
- Painter’s Tape: Essential for protecting areas of the railing or surrounding surfaces that you do not wish to sand.
- Safety Gear: Ensure you have a dust mask, goggles, and gloves. These are crucial to protect yourself from inhaling dust particles and to shield your eyes and hands during the project.
- Vacuum or Tack Cloth: After sanding, use these to efficiently clean up dust, ensuring a neat surface that’s ready for painting or staining.
These materials and tools will help create a smooth, efficient, and safe sanding process for your stair railing.
Preparing the Stair Railing for Sanding
Before you begin sanding your stair railing, thorough preparation is essential to ensure a smooth and effective process. Follow these steps to get the railing ready for sanding:
Clearing the Area
Start by removing any decorative items or fixtures near the railing. This includes detachable components like balusters or end caps, which can obstruct the sanding process. By clearing these items, you create a more accessible workspace and minimize the risk of accidental damage. Next, lay down drop cloths or plastic sheets around the railing to protect surrounding surfaces, such as floors and walls, from dust and debris. This step keeps your workspace clean and eases the cleanup process after completing sanding.
Inspect the Railing
Carefully inspect the condition of the stair railing. Look for any damage, such as cracks, peeling paint, or remnants of old varnish. Assess whether the railing requires additional repair work before you start sanding. For instance, fill any visible cracks or gouges with wood filler, allowing it to dry and harden before proceeding. This ensures that the surface is even and ready for a smooth sanding process, ultimately leading to a more polished final result.
Using Painter’s Tape
To protect parts of the railing that aren’t meant for sanding, apply painter’s tape. Securely tape off areas like metal brackets or regions that don’t need refinishing, ensuring no accidental sanding or scratching occurs in these sections. Using painter’s tape provides clean lines, preserving the original integrity of these surfaces while allowing you to focus on the areas that require refinishing. These preparatory steps set the foundation for a successful sanding endeavor, ultimately enhancing your project’s efficacy and aesthetic outcome.

Choosing the Right Sandpaper Grit
Selecting the appropriate sandpaper grit is a pivotal step in achieving a beautifully finished stair railing. The right sequence of grits ensures your surface is adequately prepared for painting or staining, enhancing the final finish’s durability and aesthetics.
Coarse Grit (60-80 Grit)
Begin your sanding journey with coarse grit sandpaper, particularly if your railing boasts an old finish, be it paint or varnish, that needs meticulous removal. This grit is robust and aggressive, ideal for stripping surfaces quickly. To prevent the formation of gouges or uneven areas, apply even pressure as you sand. Focus on maintaining a steady, consistent rhythm to effectively eliminate as much of the old finish as possible. Pay close attention to every detail, especially in corners or rounded edges where finishes tend to accumulate, ensuring a clean slate for the next phases of sanding and finishing.
Medium Grit (120-150 Grit)
After tackling the initial layers, transition to medium grit sandpaper. This stage is crucial as it addresses any scratches left by the coarse grit, refining the surface to a more uniform and smoother state. Medium grit offers an excellent balance between removing residual imperfections and prepping the wood. It creates an optimal texture that aids in the proper adhesion of new paint or stain, enhancing the longevity and appearance of your finish. Work diligently across the entire railing, ensuring that no rough spots remain, as these can compromise the quality of the finish.
Fine Grit (220 Grit)
The final step in the sanding process involves using fine-grit sandpaper, which polishes the surface to a smooth and elegant sheen. This grit is essential for final preparations before staining or painting, allowing the finish to glide on evenly and adhere perfectly, elevating the wood’s visual appeal and protection. When using fine grit, always sand along the grain of the wood. This approach prevents unsightly cross-grain scratches and preserves the wood’s natural beauty and texture. By meticulously following this progression of sanding grits, you’ll ensure your stair railing is visually stunning and expertly prepped for the next stages of your project.
How to Sand Stair Railing: Sanding the Stair Railing
Embarking on the sanding process is a meticulous task that requires attention to detail, ensuring every surface of the stair railing is precisely prepped for a stunning finish. Follow these guidelines to effectively sand both flat and intricate areas of your railing.
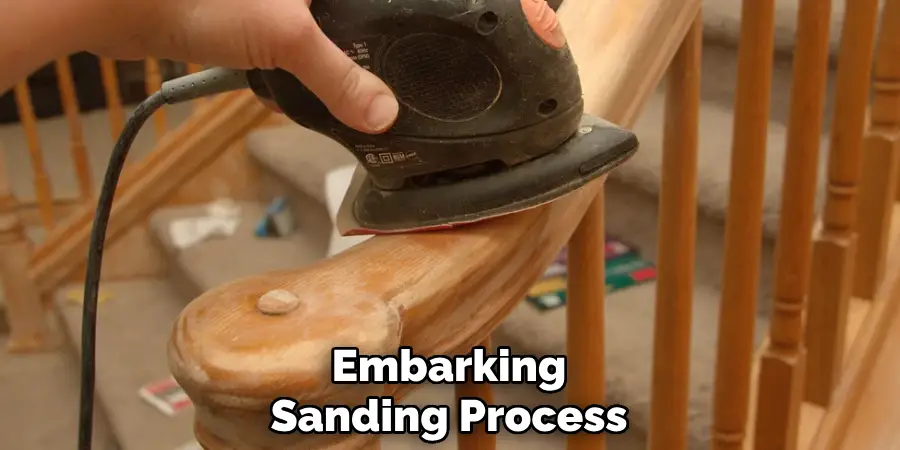
Sanding Flat Surfaces
Using a sanding block or an electric sander is highly recommended for the flat surfaces of the railing, such as handrails and square edges. These tools allow you to apply even pressure and maintain consistency, which is crucial for achieving a smooth and uniform finish. Sand in long strokes, always following the wood grain to avoid creating scratch marks that might mar the final appearance. To prevent over-sanding, it’s essential to frequently pause and check the surface texture, ensuring that you don’t inadvertently thin the wood or cause undesired depressions.
Sanding Curved or Detailed Sections
When it comes to curved or ornate sections of the railing, such as carved details or rounded edges, sanding sponges or flexible sanding pads are your best allies. These tools can adapt to the shapes of the molding, making it easier to work on these intricate areas without causing damage.
Hand-sanding these parts is crucial because it allows you to use small, precise circular motions that reach into crevices and detailed carvings, ensuring that every part is evenly sanded without losing the integrity of the design. Additionally, for extremely small or highly intricate sections, employing detail sanders or specialized tools can be advantageous; these tools can access areas that traditional sandpaper may not reach easily, facilitating a more thorough job.

Sanding Between Balusters (Spindles)
Sanding between spindles or balusters presents its own set of challenges, primarily due to the tight spaces involved. For these areas, small sanding pads or sandpaper folded into narrow strips can be particularly effective, allowing you to reaeffectively picksh difficult spots with precision. It’s important to use consistent pressure to ensure that the surfaces are evenly sanded, as variance in pressure can lead to unevenness, which would become more visible upon finishing. Consistency is key here, as it ensures that the surfaces are uniformly prepared for painting or staining, contributing to the overall aesthetics and durability of the finished railing.
By dedicating time and care to these sanding steps, your stair railing will be impeccably prepared for the next stages of your renovation project. Each surface, whether flat or detailed, should present an ideal foundation for the finish, ultimately revealing the beauty of the wood and your craftsmanship.
Cleaning the Surface After Sanding
Proper cleaning after sanding is crucial to ensure a flawless finish on your stair railing during staining or painting. Removing all dust and debris left from the sanding process is essential for a pristine outcome.
Removing Dust and Debris
Begin the cleaning process by using a vacuum cleaner equipped with a brush attachment. This tool effectively picks up fine dust and wood particles from the railing surface and the surrounding area. It’s important to thoroughly vacuum between spindles and in small crevices to ensure that no dust is left behind, as any remaining debris may interfere with the adhesion of paint or stain, compromising the final finish’s quality and appearance.

Wiping Down the Surface
Following vacuuming, use a tack cloth or a damp microfiber cloth to wipe down the entire railing. This step is vital as it captures any residual dust particles, leaving the surface impeccably clean. A tack cloth, specifically designed for this purpose, picks up fine dust without leaving residue. Alternatively, a slightly damp microfiber cloth works well for effectively removing dust.
A thoroughly cleaned surface ensures that your chosen finish will adhere smoothly and evenly, resulting in a polished and professional final appearance. You’ll lay the groundwork for a successful and beautiful finish by meticulously executing these cleaning steps.
Conclusion
Sanding plays a pivotal role in preparing a stair railing for refinishing, whether you’re opting for painting or staining. The importance of this step cannot be overstated, as proper sanding ensures that the finish will adhere uniformly and result in a professional-looking surface. Taking your time during the sanding process is key to achieving the best results.
Focus on applying even pressure and gradually smoothing the surfaces, as this will prevent imperfections in the final appearance. It’s crucial to follow the proper techniques in “how to sand stair railing” to enhance both the aesthetic and functional aspects of your stairway. A well-finished railing not only elevates the visual appeal of your home but also adds to its overall value. Regular maintenance, including gentle cleaning and occasional touch-ups, preserves the finish and extends the life of your beautifully transformed railing.
About
Angela is the chief editor of Indoorense. She began her career as an interior designer before applying her strategic and creative passion to lifestyle and home.
She has close to 15 years of experience in creative writing and online content strategy for housekeeping and cleaning,home decorations as well as other efforts.
She loves her job and has the privilege of working with an extraordinary team. She lives with her husband, two sons, and daughter in Petersburg. When she’s not busy working she spent time with her family.