

Are you tired of hair getting tangled around the roller of your Shark vacuum? This can be frustrating and time-consuming to clean, but fortunately, you can take some simple steps to remove hair from the roller.
How to remove hair from Shark vacuum roller requires regular upkeep, including the removal of hair tangled around the vacuum roller. Over time, hair and debris can accumulate on the roller, reducing suction power and potentially damaging the motor. Addressing this issue promptly helps to ensure that your vacuum performs optimally and prolongs its lifespan. This guide will provide a step-by-step process for effectively removing hair from the vacuum roller, allowing you to keep your home cleaner and your vacuum in top condition.
With the right approach, you can easily manage this maintenance task and keep your Shark vacuum running smoothly.
What Will You Need?
Before diving into the steps, it’s important to have the right tools and materials for this task. Here’s what you’ll need:
- A pair of scissors or a seam ripper
- A brush or comb
- Rubbing alcohol
- Clean cloth or paper towel
Once you have these items, you’re ready to remove hair from your Shark vacuum roller.
10 Easy Steps on How to Remove Hair From Shark Vacuum Roller
Step 1. Turn Off and Unplug the Vacuum:
Safety should always come first when performing any maintenance on electrical appliances. Begin by ensuring your Shark vacuum is turned off and unplugged from any power source. This step is crucial to prevent any accidental activation of the vacuum while working on it, which could cause injury or further entangle the hair you are trying to remove. By disconnecting the vacuum from electricity, you also reduce the risk of electrical shock, safeguarding yourself and your device during the cleaning process. With the vacuum safely unplugged, you can proceed to the next steps with peace of mind, focusing on meticulously cleaning your vacuum roller.

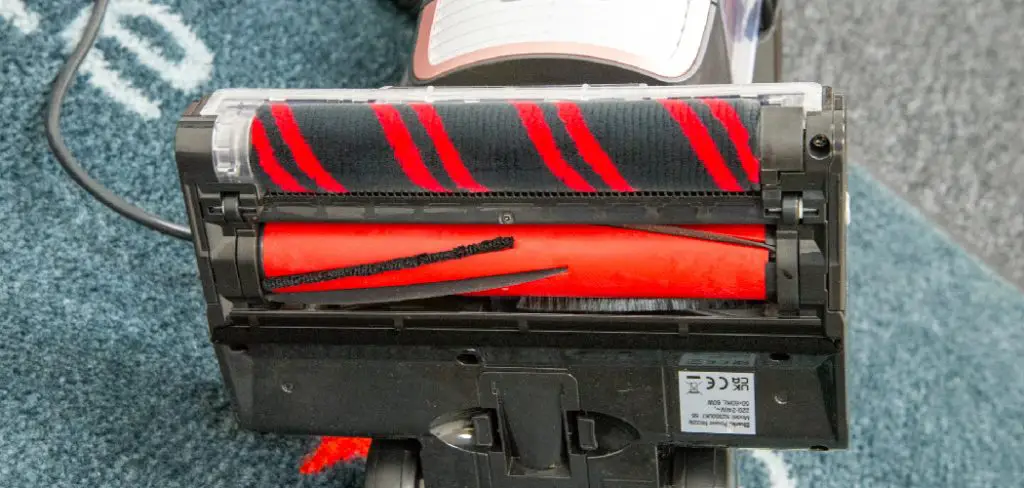
Step 2. Access the Vacuum Roller:
To access the vacuum roller, you must carefully remove the base plate or cover of your Shark vacuum. Refer to your vacuum’s manual if you need help with this, as models may vary. Typically, this involves loosening a few screws or pressing a release latch. Once the cover is off, you can clearly see the roller and the hair that has accumulated around it. Taking care to keep track of any screws or small parts, gently lift the roller out of its housing. With the roller exposed, you are prepared to begin cutting and removing the tangled hair.
Step 3. Cut Away Tangled Hair:
Using a pair of scissors or a seam ripper, carefully cut through the hair that is wrapped around the vacuum roller. Be gentle to avoid damaging the roller itself. Cut along the length of the roller, paying close attention to particularly dense areas where hair might be tightly coiled. If you’re using a seam ripper, slide the tip under sections of hair and pull upwards to break the strands apart. This approach helps to loosen the hair, making pulling away from the roller easier. As you cut, use your fingers to remove the loose hair strands gently and clear the entire roller. This step is crucial to ensure proper cleaning and prevent future blockages.
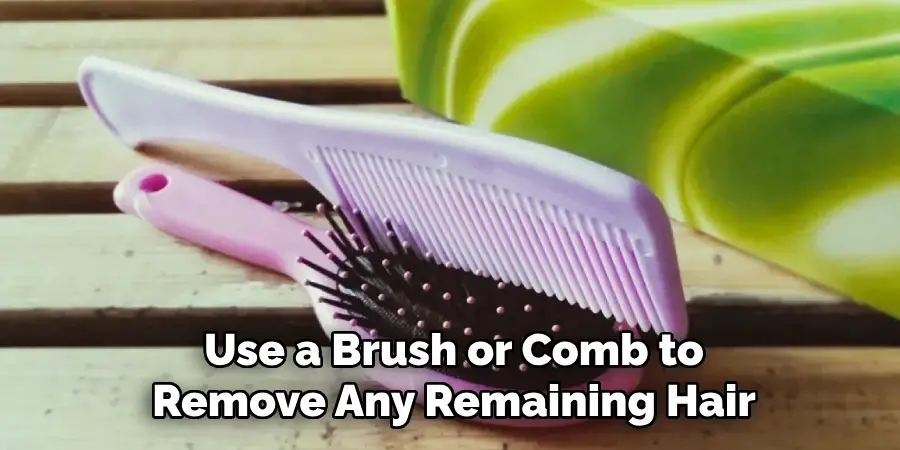
Step 4. Remove Remaining Hair with a Brush or Comb:
After cutting away most of the tangled hair, use a brush or comb to remove any remaining hair strands or debris from the vacuum roller. A brush with firm bristles can effectively sweep away loose hair, while a fine-toothed comb can help dislodge any stubborn strands still wrapped around the roller. Work systematically from one end of the roller to the other, thoroughly removing all hair and debris. Ensuring the roller is entirely free of hair will help maintain optimal vacuum performance and reduce the need for frequent cleaning in the future.
Step 5. Clean the Roller with Rubbing Alcohol:
Once you’ve removed all visible hair and debris, it’s essential to clean the roller to eliminate any remaining dust or grime. Dampen a clean cloth or paper towel with rubbing alcohol and wipe down the entire surface of the roller. This will help remove any residue and sanitize the roller, preventing the buildup of sticky substances that could attract more hair. Allow the roller to dry completely before reassembling it in the vacuum to ensure optimal performance. Cleaning the roller thoroughly is an essential step for enhancing the longevity and efficiency of your Shark vacuum.
Step 6. Inspect the Roller for Damage:
Before reassembling the vacuum, take a moment to thoroughly inspect the vacuum roller for any signs of wear and tear or damage. Look for cracks, chips, or excessive wear on the surface of the roller, as these may hinder its performance. Also, check if the roller spins smoothly by manually rotating it. If you encounter any resistance or unusual noise, there may be an underlying issue with the bearings or other internal components that needs addressing.
Paying close attention to these details can help identify potential problems early on, preventing costly repairs or replacements in the future. If you do find any damage, consider consulting the vacuum’s manual for troubleshooting tips or contacting the manufacturer for assistance. Keeping the roller in good condition improves vacuum efficiency and extends the life of your cleaning appliance.
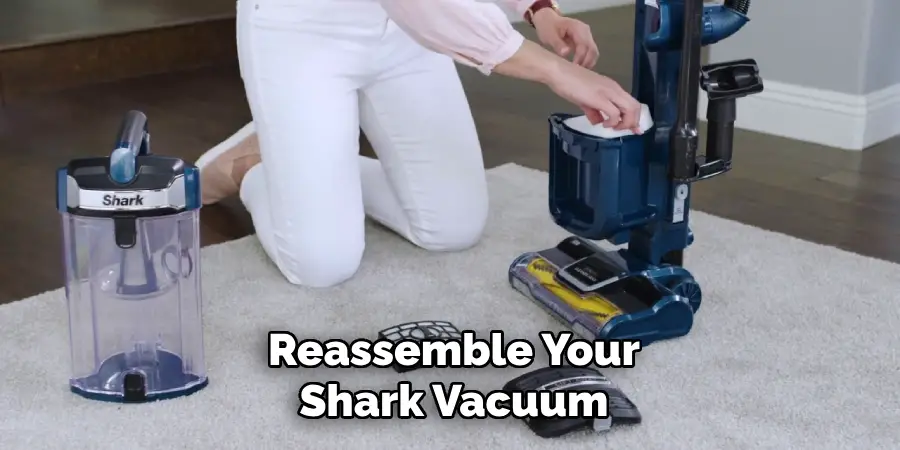
Step 7. Reassemble the Vacuum:
After ensuring that the roller is free of hair and damage, it’s time to reassemble your Shark vacuum. Carefully place the roller back into its housing, ensuring it aligns correctly with any gears or belts. Replace any screws or latches you removed earlier, securing the base plate or cover back into position. Double-check that everything is tightly fastened to prevent any parts from coming loose during operation. Once reassembled, plug the vacuum back into its power source and turn it on briefly to ensure that the roller spins freely and there are no unusual noises. With a clean and properly functioning roller, your Shark vacuum is ready to tackle household dirt and debris effectively once again.
Step 8. Establish a Regular Maintenance Routine:
To minimize the buildup of hair and debris on your Shark vacuum roller, adopt a regular maintenance routine. Depending on the volume of use and the presence of pets, you might want to inspect and clean the roller every few weeks. This proactive approach extends the lifespan of your vacuum and ensures it operates at peak efficiency, saving you time and effort in the long run. Regular maintenance can also save on repair costs by catching minor issues before they become significant problems. Consider setting a reminder for periodic vacuum maintenance as part of your cleaning schedule to keep your home environment fresh and dust-free.
Step 9. Check and Replace the Vacuum Filters:
Another crucial aspect of maintaining your Shark vacuum is ensuring the filters are clean and functional. Begin by consulting your vacuum’s manual to locate the filters, as their position may vary between models. Once you find them, remove the filters and assess their condition. It’s time for a thorough cleaning or replacement if they appear clogged or excessively dirty. Washable filters can be rinsed with water, but ensure they are scorched before reinserting them to prevent mold and damage.
If your model uses disposable filters, replace them according to the manufacturer’s recommendations. Regularly checking and maintaining your vacuum filters will improve air quality during vacuuming and enhance your appliance’s overall performance and suction capabilities.
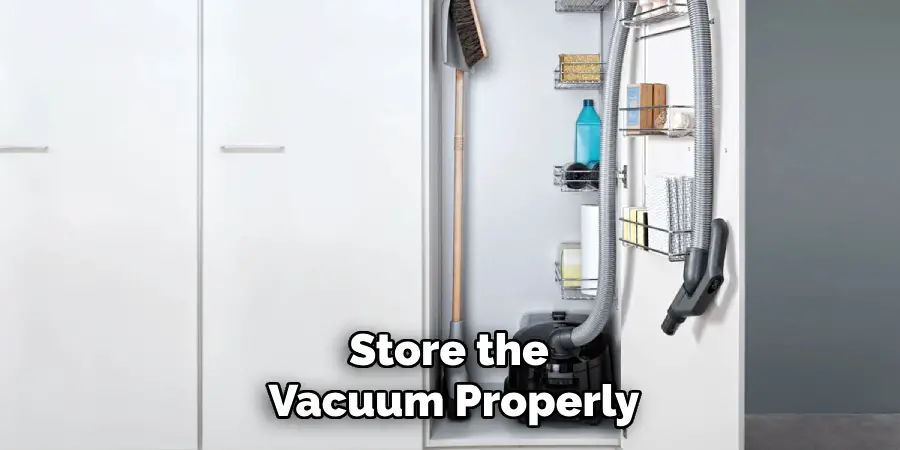
Step 10. Store the Vacuum Properly
Once you’ve completed all the cleaning and maintenance tasks, storing your Shark vacuum properly is essential to maintain its condition. Find a clean, dry area from direct sunlight and extreme temperatures, as these can degrade the vacuum’s plastic and rubber components over time. Position the vacuum upright to prevent unnecessary strain on the hoses and ensure the power cord is neatly wrapped to avoid tangling or damage. Providing a proper storage environment reduces wear and tear and keeps your vacuum ready for the next cleaning session, ensuring long-lasting performance and reliability.
By following these ten steps, you can keep your Shark vacuum in top shape and enjoy its powerful cleaning capabilities for years to come.
Conclusion
In conclusion, removing hair from your Shark vacuum roller is an essential maintenance task that ensures optimal vacuum cleaner performance and longevity.
Following a structured approach, starting with powering off the vacuum and disassembling it, to thoroughly cleaning and inspecting the roller, you can effectively eliminate hair and debris from your device. Implementing regular maintenance routines not only keeps your vacuum functioning efficiently but also helps prevent potential mechanical issues and costly repairs. Proper care and timely attention make maintaining your vacuum straightforward, allowing you to tackle dirt and debris in your home effortlessly.
Hopefully, the article on how to remove hair from shark vacuum roller has provided you with valuable insights and practical tips for keeping your cleaning appliance in top condition. Let’s keep those floors clean!
About
Angela is the chief editor of Indoorense. She began her career as an interior designer before applying her strategic and creative passion to lifestyle and home.
She has close to 15 years of experience in creative writing and online content strategy for housekeeping and cleaning,home decorations as well as other efforts.
She loves her job and has the privilege of working with an extraordinary team. She lives with her husband, two sons, and daughter in Petersburg. When she’s not busy working she spent time with her family.