
Painting stair spindles can be a rewarding DIY task that enhances the aesthetic appeal of your home. Whether you’re aiming to freshen up a tired staircase or want to add a personal touch, painting your stair spindles is a project that can be accomplished with a bit of patience and the right techniques.
This guide on how to paint stair spindles will walk you through the essentials of preparing your spindles, choosing the right paint, and executing a flawless finish, ensuring your staircase becomes a standout feature in your interior design.

What is a Stair Spindle?
A stair spindle, also known as a baluster, is a vertical post that provides support and stability to a staircase handrail. Spindles are an essential component in staircases, serving both functional and aesthetic purposes. They are usually mounted between the treads or base rail of the stairs and the handrail, forming a protective barrier that prevents falls while ascending or descending the staircase.
Beyond their practical use, stair spindles come in various designs, materials, and finishes, allowing homeowners to match or complement their interior decor style, from traditional to modern. The right choice of spindles can significantly enhance the overall look of your staircase and, by extension, your home’s interior.
Needed Materials
Before diving into painting your stair spindles, it’s essential to gather all the required materials. Here’s a list of what you’ll need:

Sandpaper (220-grit):
Sanding helps remove any existing paint, varnish or stain and creates a smooth surface to which the new paint can adhere. The grit level of 220 is suitable for sanding wooden surfaces.
Tack Cloth:
A tack cloth is a sticky, lint-free cloth used to wipe off any remaining dust after sanding.
Painter’s Tape:
Painter’s tape is used to cover areas that should not be painted, such as the handrail or stairs’ edges.
Primer:
Primer serves as a base coat and improves the adhesion of the final paint layer. Choose a primer that is specifically designed for use on wood.
Paintbrushes:
Choose good quality brushes, preferably with synthetic bristles, for a smooth and even application of paint.

Paint:
Select an interior paint suitable for wood surfaces. Satin or semi-gloss finishes are commonly used for stair spindles as they are durable and easy to clean.
8 Simple Step-by-step Guidelines on How to Paint Stair Spindles
Step 1: Prepare the Area
Before starting the painting process, preparing the area around the stair spindles is crucial to protect surfaces that shouldn’t be painted and to set yourself up for a clean job. Begin by laying down drop cloths or old sheets around the base of the staircase to catch any drips or spills.
Use painter’s tape to carefully cover and protect the handrail, the edges of the stairs, and any other surfaces adjacent to the spindles. Ensure the area is well-ventilated to allow for the effective drying of primer and paint, and if possible, remove any furniture or obstacles from the vicinity to give yourself ample workspace.
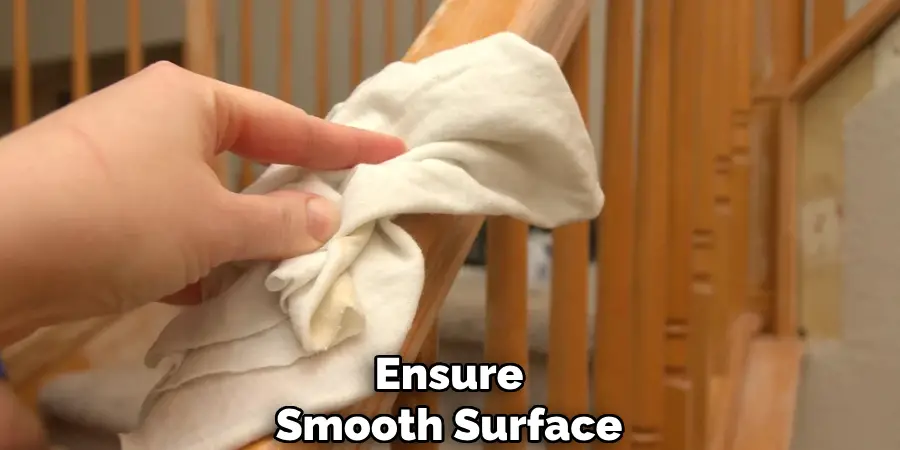
Step 2: Sand the Spindles
Once the area is prepared, the next crucial step is to sand the spindles to ensure a smooth surface for painting. Using 220-grit sandpaper, gently sand each spindle to remove any existing paint, varnish, or imperfections. Be thorough but gentle to avoid damaging the wood. Sand is used in the direction of the grain to maintain the wood’s natural texture and achieve an even finish.
After sanding, use a tack cloth to wipe down each spindle carefully, ensuring all dust and debris are removed. This step is vital because it allows the primer and paint to adhere properly, resulting in a more durable and professional-looking finish.
Step 3: Apply Primer
With the spindles sanded and dust-free, the next step is to apply a primer to create a solid base for your paint. Select a high-quality wood primer that is compatible with your chosen paint type. Using a good quality brush, begin applying the primer to each spindle, ensuring even and thorough coverage. It’s important to work methodically, starting from the top of each spindle and moving downwards to avoid drips or uneven application.
Allow the primer to dry completely as per the manufacturer’s instructions before proceeding to the next step. This step is crucial, as a well-applied primer enhances the paint’s adhesion, durability, and color fidelity, helping achieve a professional-looking finish.
Step 4: Start Painting
Once the primer is completely dry, you can start painting. Using the same technique as with the primer, begin at the top of each spindle and work your way down. Use a smooth and even stroke to avoid drips or brush marks.
Don’t overload your brush with paint, as this can lead to uneven coverage and dripping. Depending on your chosen paint type, you may need to apply multiple coats for a solid finish. Ensure each coat is thoroughly dry before applying another layer.
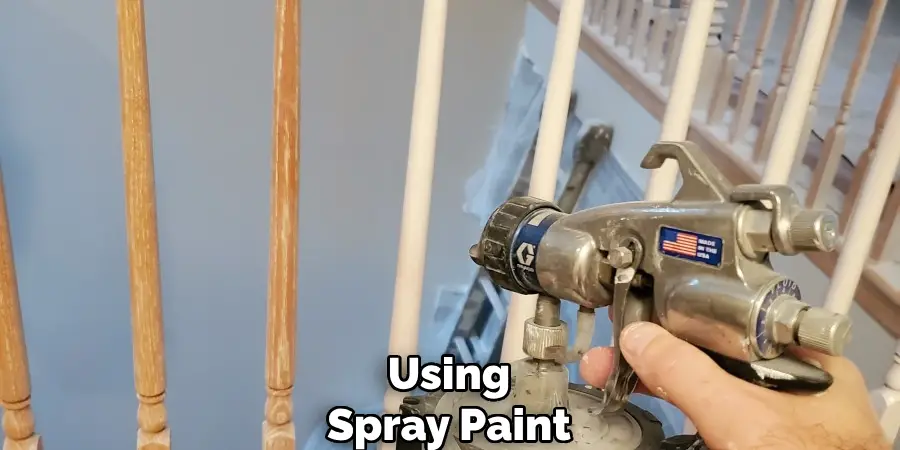
Step 5: Consider Spray Painting
An alternative to traditional brush painting is using spray paint for your stair spindles. Spray painting can significantly reduce the time spent on painting, especially if you have many spindles to cover. To begin, ensure that the surrounding area is fully protected by covering it with drop cloths or plastic sheets to prevent overspray. It’s essential to have a well-ventilated area, so consider doing this task outdoors if possible.
Choose a spray paint that is suitable for wood and provides a finish that aligns with your desired look, such as satin or semi-gloss. Hold the spray can at an even distance, approximately 8 to 12 inches away from the spindles, and apply in light, sweeping motions to avoid runs and drips. Allow each coat to dry completely before applying additional layers, and be patient as this will ensure a smooth and even finish.
Step 6: Touch Up Any Missed Spots
After the paint has fully dried, it’s essential to inspect each spindle for any missed spots or imperfections. Use a small brush and touch up any areas that need it, ensuring a clean and professional-looking finish.
The key to achieving a flawless finish is to take your time and be thorough during this step.
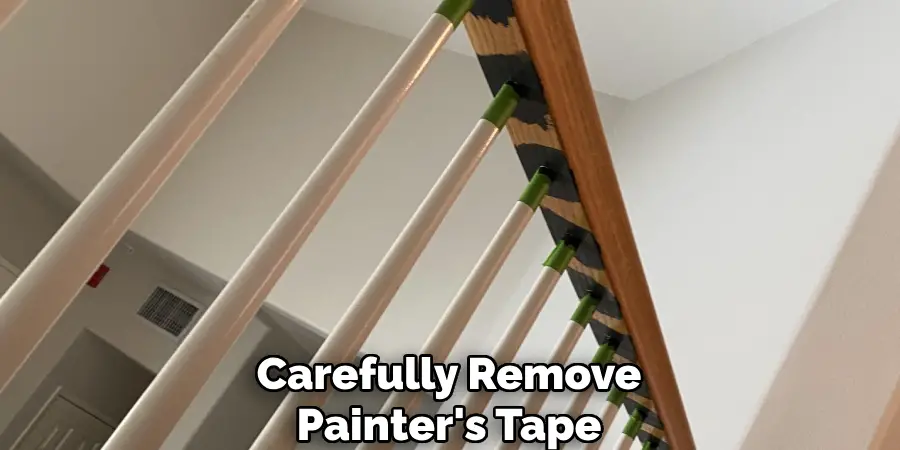
Step 7: Remove Painter’s Tape
Once you have completed the painting process and are satisfied that the paint is fully dry, it’s time to carefully remove the painter’s tape. Begin by gently peeling back the tape at a 45-degree angle to avoid tearing or removing any of the newly applied paint. Take your time during this step to ensure that you do not disturb the edges or create any unsightly lines.
If you notice any paint peeling along with the tape, use a sharp utility knife to score the edge of the tape before continuing to remove it. Properly removing the painter’s tape will leave you with crisp, clean lines that enhance the overall appearance of your newly painted stair spindles.
Step 8: Clean Up
With the painting and touch-up complete, it’s time to clean up. Dispose of any used drop cloths or plastic sheets, and carefully remove any remaining debris from the area. Thoroughly clean your brushes and any other tools used during the process, as well as wipe down any surfaces that may have come into contact with paint. With proper clean-up, you can ensure a tidy and professional-looking finish to your staircase project.
Following these step-by-step guidelines on how to paint stair spindles, you can successfully paint your stair spindles and give your staircase a fresh new look. Remember to take your time, be thorough, and follow all safety precautions when using paint and other materials. With a little patience and attention to detail, you can achieve professional results that will enhance the overall aesthetic of your home. Happy painting!
Do You Need to Use Professionals?
When deciding whether to tackle the task of painting stair spindles yourself or to hire professionals, there are several factors to consider. If you have experience with home improvement projects and feel comfortable with the steps involved, doing it yourself can be a rewarding and cost-effective option. However, hiring professionals might be the best choice if you’re short on time, lack the necessary tools, or are not confident in your painting skills.
Professionals come equipped with the expertise and equipment to ensure a high-quality finish in a shorter amount of time. Additionally, they can address any unexpected issues that may arise during the project. Ultimately, the decision depends on your comfort level with DIY projects, your budget, and your desired outcome.
How Much Could It Cost?
The cost of painting stair spindles can vary significantly depending on several factors, including whether you choose to do it yourself or hire professionals. If undertaking the project yourself, expenses primarily consist of materials such as paint, primer, brushes, painter’s tape, sandpaper, and any protective coverings like drop cloths or plastic sheets. On average, doing it yourself might cost around $50 to $150, depending on the size of the project and the quality of materials chosen.
On the other hand, hiring professional painters can be more costly but offers the advantage of expertise and faster completion. Professional services can range from $200 to $800 or more, depending on the number of spindles, their condition, and your geographical location. This estimate typically includes labor, materials, and clean-up, providing a hassle-free experience and a more guaranteed professional finish. It’s essential to get several quotes and understand what each includes to make a well-informed decision that fits your budget and needs.
Frequently Asked Questions
Q1: How Long Does It Take to Paint Stair Spindles?
A: The time it takes to paint stair spindles can vary depending on several factors, such as the number of spindles, their condition, and whether you’re working alone or with others. Generally, it can take a full day or longer to complete the painting process thoroughly, including prep work and clean-up. Hiring professionals may significantly reduce this time since they have the expertise and equipment to complete the job faster.
Q2: Do I Need to Sand Stair Spindles Before Painting?
A: It’s essential to sand your stair spindles before painting them, as this will help remove any imperfections or rough areas that may show through the paint. Sanding also helps create a smoother surface for better adhesion of the primer and paint.
Q3: Can I Paint Over Stained Wood?
A: Yes, you can paint over stained wood with proper preparation. This typically involves cleaning the wood, sanding it lightly to remove any gloss or shine, and applying a primer designed to bond with stained wood. Once the primer is dry, you can then apply your chosen paint color. It’s essential to follow the manufacturer’s instructions for best results.
Conclusion
Updating the look of your stair spindles is a simple yet effective way to enhance the overall appearance of your staircase and home. By following these step-by-step guidelines on how to paint stair spindles, you can achieve a professional-looking finish that will last for years to come.
Remember to properly prepare the area, sand, and prime before painting and to take your time during each step for the best results. With some patience and attention to detail, you can transform your staircase into a beautiful focal point in your home. Happy painting!
About
Angela is the chief editor of Indoorense. She began her career as an interior designer before applying her strategic and creative passion to lifestyle and home.
She has close to 15 years of experience in creative writing and online content strategy for housekeeping and cleaning,home decorations as well as other efforts.
She loves her job and has the privilege of working with an extraordinary team. She lives with her husband, two sons, and daughter in Petersburg. When she’s not busy working she spent time with her family.