

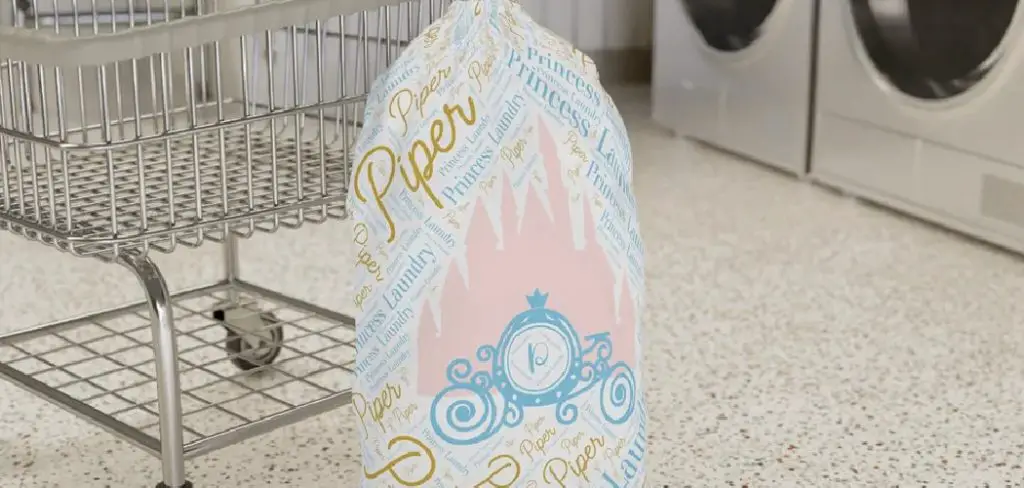
A laundry bag is a practical and stylish way to keep your clothes organized and transport them to the washing machine or laundromat. Whether you’re looking to declutter your space or want a personalized touch to your laundry routine, making your own laundry bag can be a fun and fulfilling project. In this guide, we will walk you through creating a simple yet functional laundry bag using basic sewing skills. You’ll learn how to choose the right materials, cut the fabric, sew the bag together, and add finishing touches to make it uniquely yours.
By the end of this guide, you’ll have a beautiful laundry bag that reflects your style while serving a practical purpose. Let’s dive into the sewing world and create your very own laundry bag! Throughout this journey, you’ll discover essential tips and techniques on “how to make a laundry bag” that you’ll cherish for years.
Materials Needed
Creating a functional and stylish laundry bag involves selecting the right materials to ensure durability and ease of use. Here’s a comprehensive list of the essential supplies you’ll need:
- Fabric: Choose a sturdy fabric that can withstand the wear and tear of laundry. Canvas, denim, or cotton are great options due to their resilience and ease of sewing. Depending on the size of the laundry bag you want to create, you’ll need about 1 to 2 yards of fabric.
- Thread: Select a thread that matches your fabric. Using a strong polyester thread is recommended for added durability, especially since the laundry bag will frequently carry heavy loads.
- Scissors: A good pair of fabric scissors is crucial for making clean, precise cuts and ensuring smooth and even fabric edges.
- Measuring Tape: Accurate measurements are essential to ensure your laundry bag is the right size. A measuring tape will help you properly cut your fabric to the desired dimensions.
- Sewing Machine: A basic sewing machine is ideal for speeding up the sewing process and achieving a professional finish. However, hand-sewing is a viable alternative if you prefer a more hands-on approach.
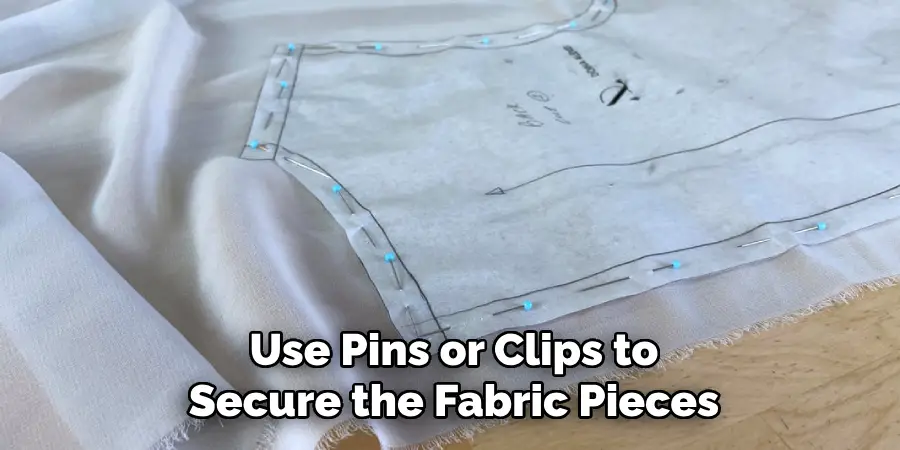
- Pins or Clips: These are useful for holding your fabric pieces together while you sew, preventing any slipping or misalignment.
- Iron: An iron will help press your fabric and seams, giving the laundry bag a polished and finished appearance.
- Optional: Consider adding fabric paint or patches to personalize your laundry bag. These elements can impart a unique touch, transforming a simple bag into a statement piece.
How to Make a Laundry Bag: Choosing the Design and Dimensions
Step 1: Decide on the Size
Before you begin crafting your laundry bag, consider how much laundry you typically carry. A standard size is approximately 24 inches wide by 36 inches tall—ideal for accommodating many clothes. However, tailor these dimensions to your specific needs; perhaps a smaller bag for lightweight loads or a larger one for ample collections.

Step 2: Choose the Design
With a plethora of styles available, selecting the right design for your laundry bag is crucial. Options include drawstring bags, tote bags, and collapsible designs. This project will focus on the drawstring style due to its straightforwardness and practicality. Drawstring bags are easy to sew and convenient for carrying and storing laundry.
Step 3: Cut Your Fabric
Once you’ve confirmed your desired size, cut two pieces of fabric matching your specified dimensions. For a conventional bag size of 24 by 36 inches, prepare two fabric pieces of 24 by 36 inches each. If you intend to incorporate a lining for added durability and aesthetics, prepare two additional pieces from the lining fabric in the same measurements.
Step 4: Prepare the Fabric
It is advisable to wash and iron your fabric prior to sewing. Washing pre-shrinks the material, ensuring your laundry bag retains its intended size and shape after future washes. Ironing eliminates creases, providing a smooth surface for precise sewing. This preparatory step is important for achieving a professional and long-lasting finish in your project.
How to Make a Laundry Bag: Sewing the Laundry Bag
Step 1: Pin the Fabric Pieces Together
Place the two pieces of fabric with the right sides together, ensuring that the sides that will eventually show are facing inward. Use pins or clips to secure the fabric pieces along the edges, leaving the top edge open, as this will be the opening of your bag. If you’re using a lining, repeat this process with the lining pieces, placing their right sides together and securing the edges with pins or clips.
Step 2: Sew the Side Seams
With the fabric pieces pinned, start by sewing along the two side edges of the fabric using a sewing machine. Maintain a seam allowance of about ½ inch from the edge to ensure the sides are securely fastened. If you’re including a lining, sew the side edges of the lining fabric similarly. This creates the basic enclosed shape of your laundry bag, setting the foundation for the final assembly.
Step 3: Sew the Bottom Seam
Proceed to sew the bottom edge of the bag, reinforcing the seam by sewing twice along the same path for added strength. This is particularly important as the bottom seam will experience the most strain while carrying laundry. If you’re using a lining, sew the bottom seam of the lining as well, ensuring it can withstand the weight of the contents.
Step 4: Create a Drawstring Casing
To form a drawstring casing, fold down the top edge of the bag about 2 inchesit can and secure it in place with pins. Sew around this folded edge, but remember to leave a small gap (approximately 1 inch) on one side. This gap is crucial as it will allow you to insert the drawstring later, enabling the bag to close securely.
Step 5: Box the Corners (optional)
Boxing the corners is an optional step worth considering for those who desire a flat-bottomed bag. To achieve this, flatten each bottom corner of the bag, forming a triangular shape. Measure about 2 inches from the tip of this triangle and sew across. After sewing, trim off the excess fabric. This can dramatically improve the bag’s shape and capacity. If you’re using a lining, repeat this process to ensure consistency in shape and support.

Step 6: Turn the Bag Right Side Out
With all seams securely in place, carefully turn the bag right side out by pulling the fabric through the open top edge. If a lining is used, turn the lining right side out as well and place it inside the primary fabric bag, aligning the seams. With the right side outright sides facing inward, your bag will be nearly complete, with only the finishing elements left to add.
Inserting the Drawstring and Final Touches
Step 1: Prepare the Drawstring
Cut a length of cord or fabric for the drawstring, typically around 48 to 60 inches, though you can adjust this according to your preference. If you opt for fabric, cut a strip approximately 2 inches wide, fold it in half lengthwise, and sew along the edge to form a tube. This will serve as a durable drawstring for your bag.
Step 2: Insert the Drawstring
Attach a safety pin to one end of the drawstring to thread the drawstring through the casing. Guide the safety pin through the opening left in the casing during sewing, threading it all the way around until both ends of the drawstring emerge from the gap. Ensure the drawstring hangs evenly on both sides for symmetrical closure.
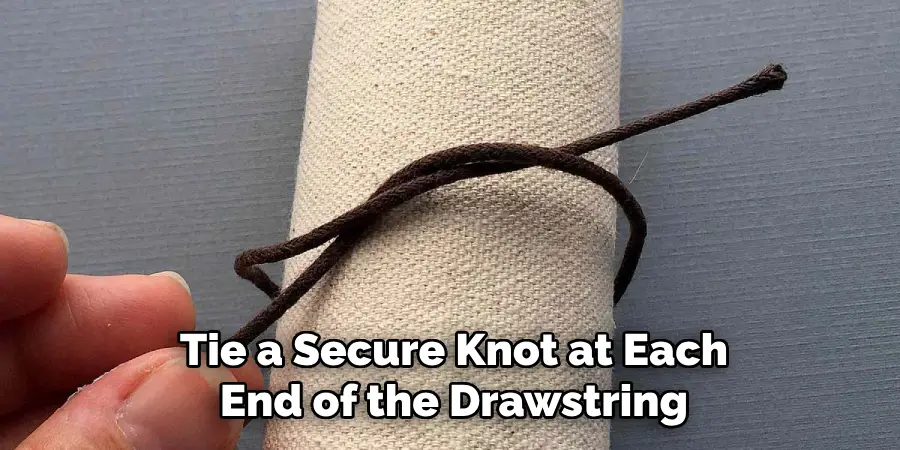
Step 3: Secure the Drawstring
Once through, pull the ends of the drawstring to gather the fabric, forming the opening of the bag. Tie a secure knot at each end of the drawstring to prevent it from slipping back into the casing. This knot ensures that your drawstring remains functional and prevents it from getting lost within the fabric casing.
Step 4: Finish the Bag
With the drawstring in place, place the lining inside the main bag if used, ensuring a neat finish. Press the top edge of the bag with an iron to create a crisp, polished look. For a personalized touch, consider adding fabric paint, patches, or embroidery to make your laundry bag unique and reflect your style.
Conclusion
Making your own laundry bag is a rewarding project that allows you to customize your storage solution while honing your sewing skills. Following this guide, you’ve created a functional and stylish laundry bag that suits your needs. Remember to choose durable materials and consider personal touches to make your laundry bag uniquely yours.
Whether you use it at home, at the laundromat, or while traveling, your handmade laundry bag will serve as a practical tool in your daily routine. Enjoy your new creation, and feel free to experiment with different fabrics and designs in future projects. Happy sewing! By embracing the process of “how to make a laundry bag,” you’ve taken a creative step in tailoring an everyday item to fit your personal style and requirements, merging practicality with personal expression.
Check it out to Restore Old Mirrors
About
Angela is the chief editor of Indoorense. She began her career as an interior designer before applying her strategic and creative passion to lifestyle and home.
She has close to 15 years of experience in creative writing and online content strategy for housekeeping and cleaning,home decorations as well as other efforts.
She loves her job and has the privilege of working with an extraordinary team. She lives with her husband, two sons, and daughter in Petersburg. When she’s not busy working she spent time with her family.