
Building a kitchen peninsula can be a rewarding home improvement project that enhances both the functionality and aesthetics of your cooking space. A peninsula serves as an extension of the existing cabinetry and often includes additional counter space, storage, and seating options. It can act as a versatile solution for creating a natural divide between the kitchen and adjoining rooms while maintaining an open and inviting layout.
Whether you’re aiming to improve your kitchen’s flow, accommodate more guests, or simply add more working space, a thoughtfully designed peninsula can make all the difference. This guide on how to build a kitchen peninsula will walk you through the essential steps and considerations for successfully building your own kitchen peninsula.

Why Build a Kitchen Peninsula?
Before diving into the building process, it’s essential to understand why you might want to build a kitchen peninsula in the first place. As mentioned earlier, a peninsula can serve as a multi-functional addition to your kitchen. Here are some of the key benefits and reasons for choosing to build a kitchen peninsula:
Extra Counter Space:
A peninsula is an excellent solution for adding more counter space without sacrificing floor space. It can provide an additional surface for food preparation, serving, or displaying items.
More Storage Options:
With the addition of a peninsula, you can increase your kitchen’s storage capacity by incorporating base cabinets and shelving into its design. This extra storage can help you keep your counters clutter-free and maximize your kitchen’s organization.
Functional Divide:
A peninsula can act as a natural divider between the kitchen and adjacent areas, such as a dining room or living room. It creates a visual boundary without closing off the space completely, maintaining an open feel and flow.
Seating Area:
If you often entertain guests in your home, a peninsula can be an excellent solution to add more seating options to your kitchen. It can act as a breakfast bar or serve as a casual space for guests to sit and chat while you cook.

Considerations Before Building
Before diving into the building process, there are a few key factors to consider to ensure that your kitchen peninsula is functional, practical, and aesthetically pleasing.
Layout:
The layout of your kitchen is a crucial consideration when planning for a peninsula. You need to make sure that the addition of a peninsula will not disrupt the flow and functionality of your kitchen.
Size and Shape:
The size and shape of your peninsula will depend on the available space in your kitchen and its intended purpose. It’s essential to take accurate measurements and choose a size and shape that fits well within your kitchen’s overall design.
Materials:
Selecting high-quality materials is crucial for building a durable, functional, and visually appealing peninsula. Consider factors such as durability, maintenance, and aesthetic preferences when choosing materials for your project.
Electrical and Plumbing:
If you’re planning to include a sink or appliances in your peninsula, make sure to consult with a professional plumber and electrician to ensure proper installation of plumbing and electrical connections.
8 Steps on How to Build a Kitchen Peninsula
Step 1: Measure and Mark
The first step in building your kitchen peninsula is to accurately measure and mark the area where the peninsula will be installed. Begin by determining the exact size and shape of the peninsula based on your kitchen layout and needs. Use a tape measure to take precise measurements of the available floor space, ensuring that the peninsula’s dimensions align with your kitchen’s flow and aesthetics.
Next, use a pencil or chalk line to mark the outline of the peninsula on the floor, being careful to include clear markings for any planned appliances, cabinetry, or seating areas. Accurate measurements and markings are crucial for ensuring a smooth building process and a well-integrated final result.

Step 2: Prepare the Floor
Once you have marked the area, it’s time to prepare the floor for installation. If your kitchen has a solid concrete or tile floor, you can skip this step and move on to step three. However, if you have a wooden subfloor, it’s important to reinforce it before installing the peninsula.
Use plywood or cement backer board to strengthen the subfloor and ensure that it can support the weight of cabinets and countertops.
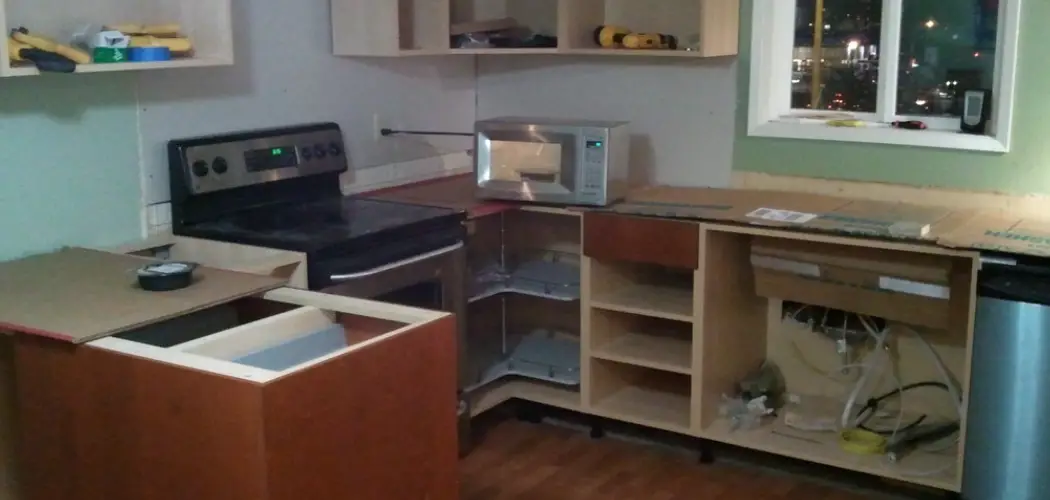
Step 3: Install Base Cabinets
With the area marked and the floor prepared, it’s time to install the base cabinets for your kitchen peninsula. Begin by positioning the cabinets along the marked outline on the floor. Ensure that the cabinets are level and aligned properly with one another. You may need to use shims under the cabinet bases to achieve a level installation on uneven flooring. Secure the cabinets to each other using screws, making sure that the cabinet faces remain flush and evenly aligned.
Next, attach the cabinets to the floor by securing them with screws through the bottom of the cabinets into the reinforced subfloor or directly into the floor if previously skipped. For added stability, it may also be beneficial to anchor the cabinets to the wall, especially if your design includes wall-adjacent edges. Confirm that all cabinets are securely installed before proceeding to the next steps, as a solid foundation is essential for the successful integration of your peninsula’s countertops and additional features.
Step 4: Install Countertops
Once the base cabinets are in place, it’s time to install your kitchen peninsula’s countertops. Begin by carefully measuring and cutting your chosen countertop material to fit the dimensions of your peninsula. Remember to include any necessary cutouts for appliances or sinks.
Next, attach the countertops to the base cabinets using screws or adhesive, depending on the materials used. If you choose to use screws, make sure they are placed in inconspicuous areas and filled with putty before proceeding to the next step.
Step 5: Add Finishing Touches
With the structure of your peninsula complete, it’s time to add some finishing touches to enhance its appearance and functionality. Depending on your design, this may include adding a backsplash, installing cabinet hardware, or attaching decorative trim.
If your peninsula includes seating, add stools or chairs to complete the look and functionality of the space. Additionally, installing under-cabinet lighting can enhance both the appearance and usability of your kitchen peninsula.

Step 6: Install Electrical and Plumbing Connections
For kitchen peninsulas that incorporate sinks or appliances, installing the necessary electrical and plumbing connections is a critical step. Begin with the plumbing if your design requires a sink. Consult with a professional plumber to ensure proper installation and compliance with local building codes. The process typically involves connecting water supply lines and drainage pipes to the sink, and securing all components to prevent leaks. Ensure that shut-off valves are easily accessible for maintenance.
For electrical connections, it’s important to hire a licensed electrician. They will handle the installation of outlets, lighting, or any built-in appliances within your peninsula. The electrician should run the necessary wiring through the base cabinets or within the countertop to connect the devices to your home’s electrical grid. Make sure all outlets are GFCI-rated for safety in a kitchen environment. Once both plumbing and electrical installations are complete, test all connections to confirm they are functioning correctly before proceeding to the final stages of your project.
Step 7: Apply Finishing Touches
With all major components installed and connected, it’s time to add any final touches to complete your kitchen peninsula. This includes painting or staining the cabinets and trims, applying a sealant to the countertops, and adding any desired decorative elements such as wall art or plants.
Additionally, functional accessories such as a pull-out trash bin or built-in spice rack can be added for convenience. Don’t forget to thoroughly clean up after yourself before enjoying your new kitchen peninsula!
Step 8: Maintenance Tips
Proper maintenance of your kitchen peninsula is crucial for ensuring its longevity and functionality. Regularly clean the countertops with mild soap and water, avoiding harsh chemicals that could damage the surface. Similarly, wipe down cabinets and trim with a damp cloth to prevent the buildup of dirt and grime.
It’s also important to regularly check for any signs of wear or damage in the plumbing or electrical connections and address them promptly to avoid larger issues down the line. Lastly, be mindful of the weight on your peninsula’s countertops and avoid placing heavy objects directly on them to prevent potential cracks or damage.
Frequently Asked Questions
Q1: Do I Need a Professional to Install My Kitchen Peninsula?
A1: It is recommended to hire professionals for certain tasks, such as plumbing and electrical connections, to ensure safety and compliance with building codes. However, if you have experience and feel confident in your abilities, you can install the peninsula yourself. Just be sure to follow all safety protocols and consult with experts if needed.
Q2: Can I Install a Kitchen Peninsula in an Existing Kitchen?
A2: Yes, a kitchen peninsula can be installed in an existing kitchen as long as there is enough floor space and proper support for the cabinets and countertops. It may require some modifications to existing cabinetry or flooring, so it’s best to consult with a professional for guidance.
Q3: What Materials Can I Use for My Countertops?
A3: The most common materials used for countertops include granite, quartz, marble, laminate, and solid surface. Each material has its own benefits and drawbacks, so it’s best to research and choose the one that fits your budget, design aesthetic, and lifestyle.
With these steps on how to build a kitchen peninsula, you can successfully add a functional and stylish addition to your kitchen. Remember to plan carefully, consult with professionals when needed, and take necessary safety precautions throughout the process. With proper maintenance, your kitchen peninsula will continue to serve as a valuable and enjoyable part of your home for years to come.

Conclusion
Installing a kitchen peninsula is an excellent way to enhance both the form and function of your kitchen space. By following these steps on how to build a kitchen peninsula and properly maintaining your peninsula, you can create a beautiful and functional addition that will serve as a focal point in your home for years to come.
Don’t be afraid to get creative with your design and have fun personalizing your kitchen peninsula to fit your unique style and needs. Enjoy the process and happy renovating!
About
Angela is the chief editor of Indoorense. She began her career as an interior designer before applying her strategic and creative passion to lifestyle and home.
She has close to 15 years of experience in creative writing and online content strategy for housekeeping and cleaning,home decorations as well as other efforts.
She loves her job and has the privilege of working with an extraordinary team. She lives with her husband, two sons, and daughter in Petersburg. When she’s not busy working she spent time with her family.